
스프링 기반으로 개발하여, 디스패처 서블릿을 WEBXML 에 MVC 방식으로 매핑하여 개발하였을 때, 많은 복잡성이 발생한다.
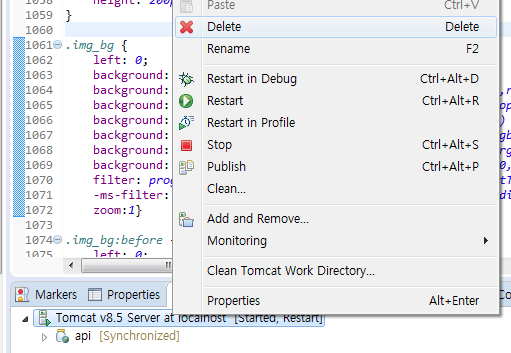
톰캣의 배포된 실행 패키지를 정상 종료 시키지 않고 삭제하면, LOCK 이 걸려 재 컴파일해서 RUN 하더라도 쉽게 원하는 패키지가 실행되지 않는다.
그 때는 아예, 톰캣 서버를 완전히 지우고, 새로 서버를 만들어 실행한다.

스프링 기반으로 개발하여, 디스패처 서블릿을 WEBXML 에 MVC 방식으로 매핑하여 개발하였을 때, 많은 복잡성이 발생한다.
톰캣의 배포된 실행 패키지를 정상 종료 시키지 않고 삭제하면, LOCK 이 걸려 재 컴파일해서 RUN 하더라도 쉽게 원하는 패키지가 실행되지 않는다.
그 때는 아예, 톰캣 서버를 완전히 지우고, 새로 서버를 만들어 실행한다.
[notion] 데이터베이스(페이지) 삭제(아카이빙)
[nodejs] aws lambda 에서 httprequest with get param
http api 형태로 하여 api gateway를 생성하였을 때,
https://api경로.execute-api.ap-northeast-2.amazonaws.com/default/api명?파라미터명=데이터
[index.js]
const http = require('https')
exports.handler = async (event) => {
return httprequest(event).then((data) => {
const response = {
param: event,
statusCode: 200,
body: JSON.stringify(data),
};
return response;
});
};
function httprequest(event) {
return new Promise((resolve, reject) => {
const options = {
host: '호스트명(url경로)',
path: encodeURI('/[중간경로]?파라미터명='+event.queryStringParameters.파라미터명),
port: 443,
method: 'GET'
};
const req = http.request(options, (res) => {
if (res.statusCode < 200 || res.statusCode >= 300) {
return reject(new Error('statusCode=' + res.statusCode));
}
var body = [];
res.on('data', function(chunk) {
body.push(chunk);
});
res.on('end', function() {
try {
body = JSON.parse(Buffer.concat(body).toString());
} catch(e) {
reject(e);
}
resolve(body);
});
});
req.on('error', (e) => {
reject(e.message);
});
// send the request
req.end();
});
}
[Workers] Cloudflare Workers로 서버리스 코딩
Cloudflare 는 https를 쉽게 제공해주는 서비스로 출발하였다.
해당 기능은 라우팅이나 호스팅과 관련이 있는데, 마이크로 서비스를 사용할 수 있는 Workers를 제공한다.
현재는 nodejs 밖에 사용하지 못한다고 하나, aws에서 nodejs를 lambda로 사용해 봤기 때문에 조금은 수월하게 접근할 수 있었다.
간단한 예제들을 통해 실행, json 다루기, json을 html로 표현하기 등을 해보았다.
json 샘플에서는 header를 json으로 클라이언트에 전달하므로 html이 text로 나온다.
그래서 해당 부분만 수정하여 html 표가 그려질 수 있도록 수정했다.
추후에는 실제 API와 연결하여 활용해 보도록 해야겠다.
'content-type': 'text/html;charset=UTF-8',
[R] googleAuthR 을 이용한 oAuth 인증 및 로그인 아이디 얻기
https://code.markedmondson.me/googleAuthR/articles/google-authentication-types.html
상기 경로로 구현해 보았다.
아래 코드로 이용 가능하며, 클라이언트 id 부분은 개발자 콘솔에서 사용자 인증 정보를 웹애플리케이션에 사용하는 것으로 만들어 활용하면 된다.
localhost는 잘 되지 않아, shinyapps.io 를 사용 경로로 등록해서 잘 동작하였다.
library(shiny)
library(googleAuthR)

options(googleAuthR.webapp.client_id = "###")

ui <- fluidPage(

    titlePanel("Sample Google Sign-In"),

    sidebarLayout(
      sidebarPanel(
        googleSignInUI("demo")
      ),

      mainPanel(
        with(tags, dl(dt("Name"), dd(textOutput("g_name")),
                      dt("Email"), dd(textOutput("g_email")),
                      dt("Image"), dd(uiOutput("g_image")) ))
      )
    )
  )

server <- function(input, output, session) {

  sign_ins <- shiny::callModule(googleSignIn, "demo")

  output$g_name = renderText({ sign_ins()$name })
  output$g_email = renderText({ sign_ins()$email })
  output$g_image = renderUI({ img(src=sign_ins()$image) })

}

# Run the application
shinyApp(ui = ui, server = server)
[notion] API를 사용하여 데이터베이스의 목록 출력
여러 설명페이지에 데이터베이스 기본 정보를 출력하는 예제는 많으나, 목록을 출력하는 예제는 부족하다.
query라는 api를 이용하여 POST 방식으로 호출해야 한다.
데이터의 내용이 있을 경우 results의 배열로 리턴되며, 속성 중 column(여기서는 column)를 추가하여 존재하는 목록을 출력해 보았다.
gzip request and non-gzip request
// HTTP POST request
public String sendPost(String targetUrl, String parameters) throws Exception {
URL url = new URL(targetUrl);
disableSslVerification();
//HttpURLConnection con = (HttpURLConnection) url.openConnection();
HttpsURLConnection con = (HttpsURLConnection) url.openConnection();
con.setRequestMethod("POST");
con.setRequestProperty("charset", "UTF-8");
con.setRequestProperty("Content-Encoding", "gzip");//when gzip
con.setRequestProperty("Accept-Encoding", "gzip");//when gzip
con.setRequestProperty("content-type", "application/x-www-form-urlencoded");
con.setDoOutput(true);
DataOutputStream wr = new DataOutputStream(con.getOutputStream());
wr.write(compress(parameters));
wr.flush();
wr.close();
//non-gzip request
/*OutputStreamWriter outStream = new OutputStreamWriter(con.getOutputStream(), "UTF-8");
PrintWriter writer = new PrintWriter(outStream);
writer.write(parameters.toString());
writer.flush();*/
BufferedReader in = new BufferedReader(new InputStreamReader(new GZIPInputStream(con.getInputStream()), "UTF-8"));
String inputLine;
StringBuffer response = new StringBuffer();
while ((inputLine = in.readLine()) != null) {
response.append(inputLine);
}
in.close();
return response.toString();
}
[Vision API] 구글 드라이브 이미지 파일 리사이징 후 Vision API 사용
라이브러리 : 1B7FSrk5Zi6L1rSxxTDgDEUsPzlukDsi4KGuTMorsTQHhGBzBkMun4iDF 로 추가(OAuth2)
고급 구글 서비스 : Drive API
행아웃 채트 API 활성화
CLOUD VISION API 는 이미지를 식별해 주는데, 구글 드라이브에 업로드 된 파일은 경로 참조로 가져오기가 되지 않는다.
base64로 변환 후 사용 가능하다.
function test(){//vision api 테스트
var fileurl="구글 드라이브 이미지 파일 경로";
var data1 = JSON.parse(makeRequest(fileurl));
//data.responses[0].webDetection.bestGuessLabels[0].label, data.responses[0].webDetection.webEntities[0].description 을 추출하여 사용
Logger.log(data1.responses[0].webDetection);
}
function buildJSONRequestImgBase64(val) {//base64 인코딩 및 json 메시지 생성
var file = DriveApp.getFileById(val);
var data1 = Utilities.base64Encode(file.getBlob().getBytes());
return JSON.stringify({
requests: [{
image: {
content:data1
},
features: [{
type: "WEB_DETECTION",
maxResults: 1
}]
}]
});
}
var APIKey = 'Your key';
function makeRequest(b64) {// Make a POST request to Vision API with a JSON payload.
var visionApiUrl = 'https://vision.googleapis.com/v1/images:annotate?key=' + APIKey;
var JSON_REQ = buildJSONRequestImgBase64(b64);
var options = {
'method': 'post',
'contentType': 'application/json',
'payload': JSON_REQ
};
var response = UrlFetchApp.fetch(visionApiUrl, options);
return response.getContentText();
}
//행아웃 채팅으로 봇이 받은 이미지를 리사이징하여 저장한다.
function uploadAttachmentToDrive(attachment, folderId, fileName){//행아웃 채팅으로 받은 이미지 파일 처리 구글 드라이브로 업로드 및 썸네일 생성
var resourceName = attachment[0].attachmentDataRef.resourceName;
var blob = "";
var url = "https://chat.googleapis.com/v1/media/" + resourceName + "?alt=media"
var service = getOAuth2Service();
var response = UrlFetchApp.fetch(url, {
headers: {
'Authorization': 'Bearer ' + service.getAccessToken(),
},
'muteHttpExceptions': true,
});
if (response.getResponseCode() != 200) {
return url;
}
blob = response.getBlob();
var folder = DriveApp.getFolderById(folderId);
var uploadFile = folder.createFile(blob);
uploadFile.setName(fileName);
var width = 800;
var link = Drive.Files.get(uploadFile.getId()).thumbnailLink.replace(/\=s.+/, "=s" + width);
var blob2 = UrlFetchApp.fetch(link).getBlob().setName(fileName+"_t");
var file = folder.createFile(blob2);
return file.getId();
}
function onMessage(event) {
if(event.message.attachment != null){
var fileurl = uploadAttachmentToDrive(event.message.attachment,"폴더명",Utilities.formatDate(dt, "GMT+9", "YYYY.MM.dd HH:mm:ss"));
}
function getOAuth2Service() {
var serviceAccountPriveKey = '-----BEGIN PRIVATE KEY----------END PRIVATE KEY-----\n';
var serviceAccountClientEmail = '~gserviceaccount.com';
var scope = 'https://www.googleapis.com/auth/chat.bot';
var service = OAuth2.createService('Vote bot')
.setTokenUrl('https://accounts.google.com/o/oauth2/token')
.setPrivateKey(serviceAccountPriveKey)
.setClientId(serviceAccountClientEmail)
.setScope(scope);
if (!service.hasAccess()) {
console.log('Authentication error: %s', service.getLastError());
return;
}
return service;
}
[챗봇] 대화형 질의 응답 만들기
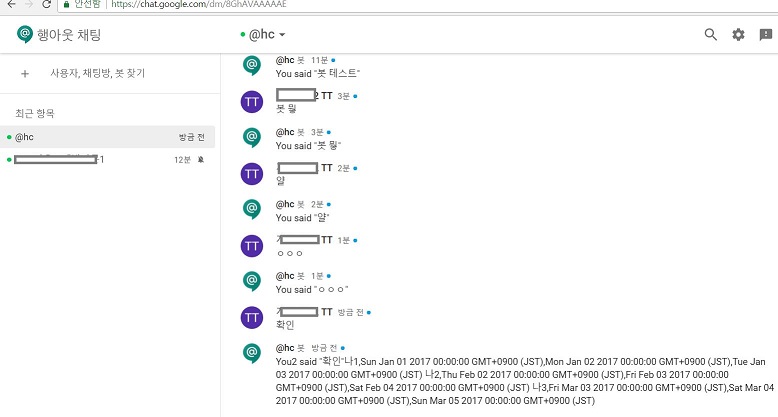
대화형 챗봇을 통해 문자열 입력시 대답하도록 한다.
채팅방에서 실행하게 되면, @봇이름 대화 형식으로 하고, DM일 경우 문자열을 입력하기만 하면 응답한다.
https://cloud.google.com/blog/products/g-suite/building-a-google-hangouts-chatbot-using-apps-script
[채팅방]

[DM]

투표하기 코드를 조금 고쳐서 스프레드시트에 응답 결과를 저장하도록 했다.
클릭 횟수를 프로세스의 단위로 삼아 1번 질문, 2번 질문, ... n번 질문 후 마지막에 앞으로 돌아가도록 했다.
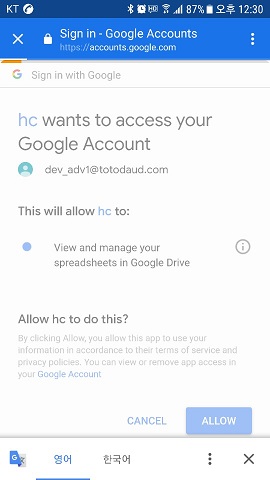
이 설문의 문제는 스프레드시트 쓰기 권한이 oAuth 로 승인되어야 해서 스크립트를 실행하여 권한을 얻어야 하는 문제가 있다.

배포된 스크립트로 하는게 아닌 메니페스토에서 배포라서 스크립트를 작성한 사용자의 권한을 대행하지 못하는 것 같다.
권한 문제가 있어 설문으로 활용할 방법에 대해 좀 더 고민해 봐야겠다.
또한 다른 도메인 사용자 일때도 안 되는 것 같다.
글로벌 권한이 있는 계정으로 다시 만들어 테스트 해봐야 겠다.

[TF] 파이썬과 케라스를 이용한 딥러닝/강화학습 주식투자
도서 [파이썬과 케라스를 이용한 딥러닝/강화학습 주식투자] 에 나온 예제를 실행해 봤다.
현재기준으로 아나콘다 3을 설치하면 python 3.8.x 가 설치되며, python path를 설정해야 제대로 실행 가능하다.
기존 2.7, 3.5 가 설치된 환경이라 여러 버전이 섞여서 다양한(?) 에러를 발생시켰다.
시스템 환경변수에 아래를 등록한다.
PYTHONPATH
c:\programdata\anaconda3;c:\programdata\anaconda3\Lib;c:\programdata\anaconda3\DLLs;c:\programdata\anaconda3\libs;c:\programdata\anaconda3\Scripts;c:\programdata\anaconda3\bin
알수 없는 오류 (set_session, get_default_graph())에 대해 대략 아래와 같이 수정하여 아웃풋을 얻었다.
[networks.py]
23 from tensorflow.keras.backend import set_session -> from tensorflow.keras.backend import clear_session
25 graph = tf.get_default_graph() -> graph = tf.compat.v1.get_default_graph()
시간이 지나면 각종 로그와 그림에 대해 이해하게 되겠지.

[GS] 다중 행에 사용자 정의 함수 사용
사용자 정의 함수는 gs 파일에 선언하여 사용 가능하다.
그런데, 그 호출 횟수가 너무 늘어나게 되면, Loading 이라고 표시되며 제대로 실행되지 않는다.
이럴 때, 최상단에 사용자 정의함수를 재정의하여 다중 행을 처리할 수 있는 선언을 사용할 수 있다.
원래 아래 함수는 dtr2 부분에 eval로 되어 있었고, 이름으 doEval인 함수였다.(인터넷 예제)
function dtr( formula ) {
if (typeof formula.map === "function") {
return formula.map(dtr);
}else if(formula){
return dtr2(formula);
}
}
붉은 부분은 스프레드 시트에서 사용할 호출 함수의 이름이다.
파란색 함수는 원래 기능을 수행할 아래 함수이다. 즉, 사용자 정의 함수가 되겠다.
스프레드 시트에서 아래 함수를 직접 호출하여 사용 가능하나, 호출이 100개 이상 되면 오류가 발생한다.
아래의 사용자 정의 함수는 ifftt의 datetime 문자열을 google의 datetime 으로 바꾸는 것으로 이벤트가 쌓일 때마다 늘어난다. 처음에는 직접 호출 가능하나 추후 오류가 발생하므로, E 컬럼에 =dtr(A1:A) 로 정의해 준다.
function dtr2(myDate){
var vv = myDate;
vv = vv.toString();
var va = vv.split(" at ");
if(va[1]==undefined){
return;
}
var ampm = va[1].split(":");
if(va[1].substr(-2)=="PM"){
myDate = new Date((va[0].replace(",","")+", "+(parseInt(ampm[0],10)+12)+":"+ampm[1].substr(0,2)+":00"));
}else{
myDate = new Date((va[0].replace(",","")+", "+parseInt(ampm[0],10)+":"+ampm[1].substr(0,2)+":00"));
}
return myDate;
}
[R] AWS에 도커로 Shiny server 설치 후 googleAuthR 을 이용
AWS t2.micro 에서 R을 이용한 shiny 패키지 설치가 잘 되지 않는다.
그래서 shiny server를 설치하더라도 3838포트는 접속 되지만 shiny app 은 실행시킬 수 없다.
sudo snap install docker
sudo docker pull rocker/shiny-verse
도커 설치 후 실행한 뒤 (여기까지는 https://wikidocs.net/66611 사이트 참고)
sudo docker container run -d -p 3838:3838 rocker/shiny-verse
sudo docker container ls
sudo docker exec -it 컨테이너명 or ID /bin/bash
쉘로 들어간 다음에
R 을 실행시키고 명령 프롬프트에서 install.packages("googleAuthR") 으로 googleAuthR 패키지를 설치한다.
그 후 home 폴더 하위에 디렉터리를 생성하고, app.R 파일을 만들어 소스를 저장한다.
기존 도커를 종료 시키고 저장한 앱을 실행시키면 추가 패키지로 인한 오류 때문에 실행되지 않은 앱들의 문제를 해결 할 수 있다.
sudo docker container stop 컨테이너명 or ID
sudo docker run --rm -d -p 3838:3838 -v /home/ubuntu/[폴더명]:/srv/shiny-server/[앱이름] rocker/shiny-verse

[R] 구글 플레이스토어 리뷰 별점까지 수집
도커에 타임존을 변경해서 실행한다.
sudo docker run -v /etc/localtime:/etc/localtime:ro -p 4445:4444 selenium/standalone-chrome &
sudo docker ps -a
sudo docker exec -it 911cca8e9f44 /bin/bash
seluser@911cca8e9f44:/$ date
Fri Apr 19 11:31:47 KST 2019
Rscript로 실행할 때는 library를 주석처리하고
Rscript --default-packages=methods,utils,httr,stringr,rvest,RSelenium 파일명.r
으로 실행한다.
library(rvest)
library(RSelenium)
library(httr)
library(stringr)
remDr <- remoteDriver(port = 4445L, browserName = "chrome")
remDr$open() #크롬 Open
remDr$navigate("https://play.google.com/store/apps/details?id={패키지명}&showAllReviews=true&hl=ko") #설정 URL로 이동
webElemButton <- remDr$findElements(using = "xpath", "/html/body/div[1]/div[4]/c-wiz/div/div[2]/div/div[1]/div/div/div[1]/div[2]/c-wiz/div/div/div[1]/div[1]/div[3]/content")
remDr$mouseMoveToLocation(webElement = webElemButton[[1]]) #정렬 방법 리스트 확장
remDr$click()
Sys.sleep(1)
webElemButton <- remDr$findElements(using = "xpath", "/html/body/div[1]/div[4]/c-wiz/div/div[2]/div/div[1]/div/div/div[1]/div[2]/c-wiz/div/div/div[2]/div[1]")
remDr$mouseMoveToLocation(webElement = webElemButton[[1]]) #최신순 선택
remDr$click()
Sys.sleep(10)
frontPage <- remDr$getPageSource() #페이지 전체 소스 가져오기
reviewNames <- read_html(frontPage[[1]]) %>% html_nodes('.bAhLNe.kx8XBd') %>% html_nodes('.X43Kjb') %>% html_text() #페이지 전체 소스에서 리뷰 정보(이름, 날짜) 부분 추출하기
reviewDates <- read_html(frontPage[[1]]) %>% html_nodes('.bAhLNe.kx8XBd') %>% html_nodes('.p2TkOb') %>% html_text() #페이지 전체 소스에서 리뷰 정보(이름, 날짜) 부분 추출하기
reviewComments <- read_html(frontPage[[1]]) %>% html_nodes('.UD7Dzf') %>% html_text() #페이지 전체 소스에서 리뷰 정보(이름, 날짜) 부분 추출하기
reviewStars <- read_html(frontPage[[1]]) %>% html_nodes('.nt2C1d') %>% html_nodes('.pf5lIe') %>% html_children() %>% html_attr("aria-label") #페이지 전체 소스에서 리뷰 정보(이름, 날짜) 부분 추출하기
reviewData <- data.frame(name=reviewNames, date=reviewDates, comment=reviewComments, stars=reviewStars)
write.csv(reviewData, "sh.csv")
remDr$close()

https://stat4701.github.io/edav/2015/04/02/rvest_tutorial/
[push챗봇] 구글 앱스 스크립트 X 행아웃 채트(구글 채트)
행아웃 채트가 구글채트로 이름이 변경되었다.
개별 도메인 사용자만 이용할 수 있는데, 무료 계정도 모바일은 가능하다.
(chat.google.com) 로 접속하면 PC에서도 이용 가능하고 대화방의 이름을 얻을 수 있기 때문에, 6의 예제 코드에 space.name 에 하드 코딩 가능하다.
https://suritam9.pe.kr/index.php?mid=imp&document_srl=1405 에서 이미 대화형 봇을 다뤘으며, 이번 건은 push형이다.
그동안은 integramat 이나 다른 수단을 이용했는데, 구글 앱스 스크립트로 바로 가능한 방법이 있어 시도해 봤다.
https://medium.com/@stephane.giron/send-push-message-to-hangouts-chat-with-apps-script-274ddadcbc55
1. 구글 클라우드 플랫폼 서비스 계정에서 계정 생성 및 키를 만든다.(JSON 형태 다운로드 파일 보관)
2. 앱스 스크립트 라이브러리에서 Oauth2 를 설치하는데, 1B7FSrk5Zi6L1rSxxTDgDEUsPzlukDsi4KGuTMorsTQHhGBzBkMun4iDF 로 검색한다.
3. 1에서 다운 받은 파일에 PRIVATE_KEY 와 CLIENT_EMAIL를 복사하고 서비스 생성 스크립트를 실행시킨다.
var PRIVATE_KEY = '-----BEGIN PRIVATE KEY-----\n...\n-----END PRIVATE KEY-----\n';
var CLIENT_EMAIL = '...';/**
* Configures the Chatbot service.
*/
function getChatbotService() {
return OAuth2.createService(‘MyChatBot’)
// Set the endpoint URL.
.setTokenUrl(‘https://accounts.google.com/o/oauth2/token')// Set the private key and issuer.
.setPrivateKey(PRIVATE_KEY)
.setIssuer(CLIENT_EMAIL)// Set the property store where authorized tokens should be persisted.
.setPropertyStore(PropertiesService.getScriptProperties())// Set the scope.
.setScope(‘https://www.googleapis.com/auth/chat.bot');
}
4. 토큰이 발행되는지 테스트 한다.
/**
* Test for getting access token
*/
function getAccessTokenTest() {
var service = getChatbotService();
if (service.hasAccess()) {
Logger.log(service.getAccessToken());
} else {
Logger.log(service.getLastError());
}
}
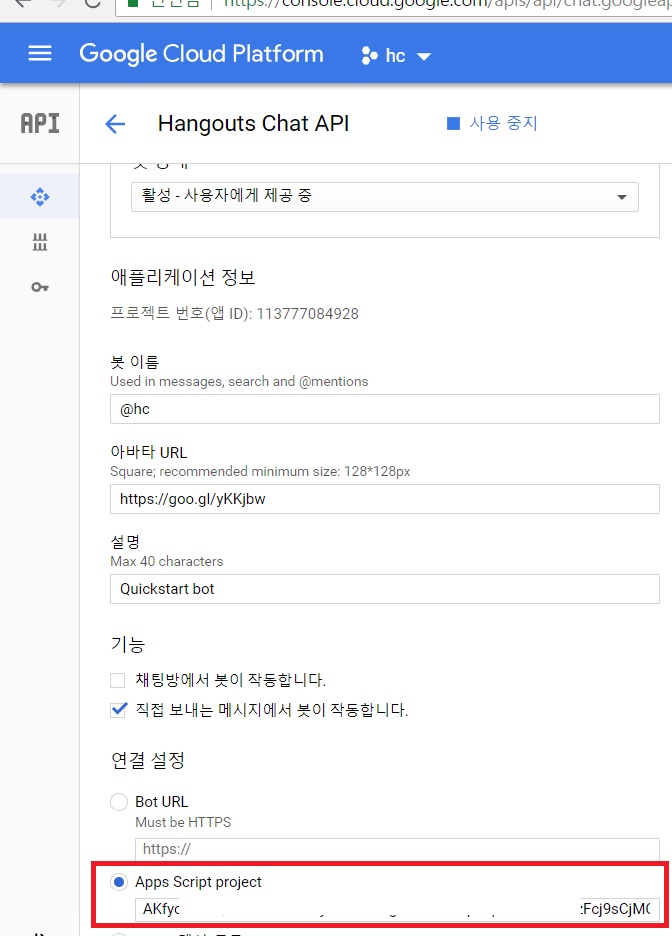
5. 참고 URL 에 빠져 있는 부분인데, 봇을 만들어 채팅방에 추가해야 한다. (봇 만들기는 다른 사이트를 검색하여 아이콘 등을 설정한다.)
권한은 도메인 내로 해야 head 배포 id 사용이 가능하다.

배포 id는 게시에 메니페스트에서 배포를 선택하여 lastesthead deployment 배포에서 getid 를 선택하여 확인한다.

6. 예제 코드를 이용해 해당 채팅방에 메시지를 보내본다.
/**
* Authorizes and makes a request to the Hangouts Chat API for :
* - Getting all spaces the bot is installed
* - Sending message when space is a Direct Message space
*/
function sendPushMessage() {
var service = getChatbotService();
if (service.hasAccess()) {
//WE retrieve all the spaces bot has been added
var url = 'https://chat.googleapis.com/v1/spaces';
var response = UrlFetchApp.fetch(url, {
headers: {
Authorization: 'Bearer ' + service.getAccessToken()
}
});
var rep = JSON.parse(response.getContentText());
if(rep.spaces && rep.spaces.length > 0){
for(var i = 0; i < rep.spaces.length; i++) {
var space = rep.spaces[i];
if(space.type == "DM"){
//We send message only to Direct Message room.
var url = 'https://chat.googleapis.com/v1/'+space.name+'/messages';
var options = {
method : 'POST',
contentType: 'application/json',
headers: {
Authorization: 'Bearer ' + service.getAccessToken()
},
payload : JSON.stringify({ text: "Hello world !" })
}
//We send message to the DM room
UrlFetchApp.fetch(url, options);
}else{
//If Type is 'ROOM' or 'TYPE_UNSPECIFIED' we don't send notification.
}
}
}else{
Logger.log('Bot is not added to any spaces');
}
} else {
Logger.log(service.getLastError());
}
}
7. 오류가 발생한다면 구글 개발자 콘솔에서 행아웃 채트 API 활성화를 누락했거나, 채팅방이 잘 확인되는지, space 에 대한 참여 멤버, 대화방 명 등을 확인해 보면 디버깅에 도움이 된다.
https://developers.google.com/hangouts/chat/reference/rest/v1/spaces
https://developers.google.com/hangouts/chat/reference/rest/v1/spaces.members
https://developers.google.com/hangouts/chat/reference/rest/v1/spaces.messages
[R] 우분투 16.04에 RStudio 설치
아마존 t2.micro에 RStudio를 설치해서 원격으로 접속해 본다.
터미널보다 실행 속도가 더 빠르다니 의아하다.
http://download2.rstudio.org/ 에서 rstudio-server-1.1.463을 설치했다.
http://infondgndg91.blogspot.com/2016/09/1604-lts-rstudio.html 등에서는 rstudio-0.99.896-amd64.deb 를 받으라고 하는데,
Package 'libssl0.9.8' has no installation candidate 에러가 발생하여 상위 버전으로 설치했다.
422 wget http://download2.rstudio.org/rstudio-server-1.1.463-amd64.deb
423 sudo gdebi rstudio-server-1.1.463-amd64.deb
이상 없으면 아래와 같이 출력되며, 자동 실행된다.
Reading package lists... Done
Building dependency tree
Reading state information... Done
This package is uninstallable
Wrong architecture 'i386'
ubuntu@ip-172-31-29-250:~$ wget http://download2.rstudio.org/rstudio-server-1.1.463-amd64.deb
--2019-04-10 00:12:20-- http://download2.rstudio.org/rstudio-server-1.1.463-amd64.deb
Resolving download2.rstudio.org (download2.rstudio.org)... 54.239.186.77, 54.239.186.152, 54.239.186.198, ...
Connecting to download2.rstudio.org (download2.rstudio.org)|54.239.186.77|:80... connected.
HTTP request sent, awaiting response... 200 OK
Length: 63566904 (61M) [application/x-deb]
Saving to: ‘rstudio-server-1.1.463-amd64.deb’
rstudio-server-1.1.463-amd64.deb 100%[=============================================================================>] 60.62M 13.8MB/s in 5.6s
2019-04-10 00:12:26 (10.7 MB/s) - ‘rstudio-server-1.1.463-amd64.deb’ saved [63566904/63566904]
ubuntu@ip-172-31-29-250:~$ sudo gdebi rstudio-server-1.1.463-amd64.deb
Reading package lists... Done
Building dependency tree
Reading state information... Done
Reading state information... Done
RStudio Server
RStudio is a set of integrated tools designed to help you be more productive with R. It includes a console, syntax-highlighting editor that supports direct code execution, as well as tools for plotting, history, and workspace management.
Do you want to install the software package? [y/N]:y
Selecting previously unselected package rstudio-server.
(Reading database ... 106368 files and directories currently installed.)
Preparing to unpack rstudio-server-1.1.463-amd64.deb ...
Unpacking rstudio-server (1.1.463) ...
Setting up rstudio-server (1.1.463) ...
groupadd: group 'rstudio-server' already exists
rsession: no process found
Created symlink from /etc/systemd/system/multi-user.target.wants/rstudio-server.service to /etc/systemd/system/rstudio-server.service.
● rstudio-server.service - RStudio Server
Loaded: loaded (/etc/systemd/system/rstudio-server.service; enabled; vendor preset: enabled)
Active: active (running) since Wed 2019-04-10 00:12:41 UTC; 1s ago
Process: 25430 ExecStart=/usr/lib/rstudio-server/bin/rserver (code=exited, status=0/SUCCESS)
Main PID: 25434 (rserver)
Tasks: 3
Memory: 14.3M
CPU: 387ms
CGroup: /system.slice/rstudio-server.service
└─25434 /usr/lib/rstudio-server/bin/rserver
Apr 10 00:12:41 ip-172-31-29-250 systemd[1]: Starting RStudio Server...
Apr 10 00:12:41 ip-172-31-29-250 systemd[1]: Started RStudio Server.
8787 포트를 방화벽에서 허용하여 접속하면, 윈도우에 설치한 RStudio와 동일하게 사용가능 하다.
[pull챗봇] 행아웃 X Google Spreadsheet with Apps script


[GS] Go To Lastrow Ctrl+↓
구글 스프레드시트에서 마지막 행으로 이동하는 방법은 단축키로 가능하다.
그러나 단축키에 익숙하지 않다면 구글 스크립트를 메뉴에 등록해 놓고 사용하도록 세팅해 놓는 것이 정신 건강에 좋을 때도 있다.
현재 선택된 시트에서 가장 아래 행으로 이동하는 스크립트이다.
많이 쓰는 기능이므로 잘 보이는 곳에 적어두면 찾기 쉽다.
function myFunction() {
var sh = SpreadsheetApp.getActiveSpreadsheet().getActiveSheet();
var lr = sh.getLastRow();
var pos = sh.getRange(lr, 1, 1, 1);
sh.setActiveSelection(pos);
}
function onOpen() {
var ui = SpreadsheetApp.getUi();
// Or DocumentApp or FormApp.
ui.createMenu('MITLab')
.addItem('아래로 이동(Ctrl+↓)', 'myFunction')
.addToUi();
}
[QT] 트레이아이콘(TrayIcon)사용하기
http://browniz1004.blog.me/220956638885
qt 트레이 showMinimized() tray -> 나의 검색어
[헤더파일]
QSystemTrayIcon *TrayIcon; //전역변수
QMenu *TrayIconMenu;
private slots:
void onSystemTryIconClicked(QSystemTrayIcon::ActivationReason); //트레이아이콘 클릭시 이벤트 설정
void on_actionExit_triggered(); //트레이아이콘 메뉴설정시 사용
private: //프로그램종료시, 프로그램 숨김시 이벤트설정
void closeEvent(QCloseEvent *event);
void hideEvent(QHideEvent *event);
[소스파일]
TrayIcon = new QSystemTrayIcon(this);
TrayIconMenu = new QMenu(this);
TrayIconMenu->addAction(ui.actionExit);
TrayIconMenu->addSeparator();
TrayIcon->setContextMenu(TrayIconMenu);
QIcon Icon(":/appMain/Resources/icon_menu_01.png"); //아이콘은 기존 리소스 경로로 지정
TrayIcon->setIcon(Icon);
TrayIcon->show();
TrayIcon->setToolTip(tr("DFC")); //트레이아이콘에 마우스 움직였을때 문구
TrayIcon->showMessage(tr("DFC"), tr("DFC."), QSystemTrayIcon::Information, 5000); //트레이아이콘 처음 적용시 설명
connect(TrayIcon, SIGNAL(activated(QSystemTrayIcon::ActivationReason)), this, SLOT(onSystemTryIconClicked(QSystemTrayIcon::ActivationReason)));
함수 선언부
void appMain::onSystemTryIconClicked(QSystemTrayIcon::ActivationReason reason)
{
switch (reason)
{
case QSystemTrayIcon::Trigger:
case QSystemTrayIcon::DoubleClick:
this->setWindowState(Qt::WindowActive);
this->show();
break;
}
}
void appMain::hideEvent(QHideEvent *event)
{
if (isMinimized())
{
this->hide();
}
QWidget::hideEvent(event);
}
void appMain::closeEvent(QCloseEvent *event)
{
if (TrayIcon->isVisible())
{
TrayIcon->hide();
}
}
void appMain::on_actionExit_triggered()
{
this->hide();
this->close();
}
위키백과 QA API X AWS lambda X API Gateway X SLACK
공공 인공지능 오픈 API·DATA 서비스 포털의 위키백과 QA API를 aws 람다로 node.js 를 이용해 slack에서 받을 수 있도록 처리했습니다.
전체적인 내용은 https://blog.aliencube.org/ko/2016/05/15/slack-github-integration-with-aws-lambda/ 를 참고하였습니다.
http://www.usefulparadigm.com/2016/04/06/creating-a-slack-bot-with-aws-lambda-and-api-gateway/
https://gist.github.com/sjoonk/20ae13e5cd8be88e9824e3bad11b2859
http://aiopen.etri.re.kr/service_list.php

exports.handler = (event, context) => {
// Sets request options
var options = {
host: 'aiopen.etri.re.kr',
port: '8000',
path: '/WikiQA',
method: 'POST',
headers: {
'Content-Type': 'application/json'
}
};
var access_key = '발급받은키';
var type = 'irqa';
// Sets the request body
var data = {
'access_key': access_key,
'argument': {
'question': event.text,
'type': type
}
};
var request = require('http');
var req = request.request(options, function (res) {
var chunks = [];
res.on("data", function (chunk) {
chunks.push(chunk);
});
res.on("end", function () {
var body = Buffer.concat(chunks);
console.log(body.toString());
body = JSON.parse(body);
console.log(body.result);
if(body.result==0){
var text = body.return_object.WiKiInfo.IRInfo[0].sent;
var ans = body.return_object.WiKiInfo.AnswerInfo[0].answer;
}else{
var text = "없음";
var ans = event.text;
}
context.succeed({
"response_type": "in_channel",
"text": "ETRI 위키백과 QA API 결과 : " + ans,
"attachments": [
{
"text": "https://ko.wikipedia.org/wiki/" + encodeURI(ans) + "\n" + text,
"color": "#7CD197"
}
]
});
});
});
req.write(JSON.stringify(data));
req.end();
};
aws gateway 에서 매핑템플릿에 application/x-www-form-urlencoded 를 추가하지 않으면, json 요청 값을 처리할 수 없으니, 꼭 추가하자.
(event undefined)
## convert HTML POST data to JSON

## get the raw post data from the AWS built-in variable and give it a nicer name
#set($rawAPIData = $input.path('$'))

## first we get the number of "&" in the string, this tells us if there is more than one key value pair
#set($countAmpersands = $rawAPIData.length() - $rawAPIData.replace("&", "").length())

## if there are no "&" at all then we have only one key value pair.
## we append an ampersand to the string so that we can tokenise it the same way as multiple kv pairs.
## the "empty" kv pair to the right of the ampersand will be ignored anyway.
#if ($countAmpersands == 0)
 #set($rawPostData = $rawAPIData + "&")
#end

## now we tokenise using the ampersand(s)
#set($tokenisedAmpersand = $rawAPIData.split("&"))

## we set up a variable to hold the valid key value pairs
#set($tokenisedEquals = [])

## now we set up a loop to find the valid key value pairs, which must contain only one "="
#foreach( $kvPair in $tokenisedAmpersand )
 #set($countEquals = $kvPair.length() - $kvPair.replace("=", "").length())
 #if ($countEquals == 1)
  #set($kvTokenised = $kvPair.split("="))
  #if ($kvTokenised[0].length() > 0)
   ## we found a valid key value pair. add it to the list.
   #set($devNull = $tokenisedEquals.add($kvPair))
  #end
 #end
#end

## next we set up our loop inside the output structure "{" and "}"
{
#foreach( $kvPair in $tokenisedEquals )
  ## finally we output the JSON for this pair and append a comma if this isn't the last pair
  #set($kvTokenised = $kvPair.split("="))
 "$util.urlDecode($kvTokenised[0])" : #if($kvTokenised[1].length() > 0)"$util.urlDecode($kvTokenised[1])"#{else}""#end#if( $foreach.hasNext ),#end
#end
}
[bWAPP] OS Command Injection [blind]
A1 - Injection
OS Command Injection
동영상에서는 ; 등으로 테스트 하는데, windows 서버라 | (pipe, vertical var)로 하면 된다.

blind 의 경우,
명령어 >> 1.txt
로 파일을 만들어 해당 파일을 접근할 수 있다.
ren 이나, copy 명령어를 사용해 파일을 바꾸거나 txt 확장자로 교체해 소스 확인도 가능할 듯 하다.
del은 쓰지 말자.


댓글 달기