메뉴 건너뛰기

imp

[Tip] Windows NT/2000/XP/2003/Vista 비밀번호 분실 해제

박영식2009.07.31 19:15조회 수 3990댓글 0

  • 3
    • 글자 크기
비밀번호를 잊었다면.


아래의 과정을 시작한다.


버전에 따라서 Password & Registry Tools 번호가 다를 수 있다.


9.9를 이용하길 추천한다.


아래 화면에서 1이나 2를 통해 OS를 찾는다.
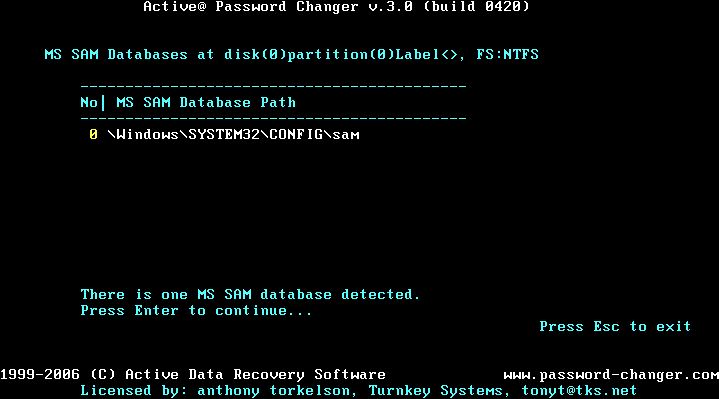


얼마간의 시간이 지나면
 
아래와 같이 발견된 sam 파일을 표시한다.


원하는 계정을 선택하고


Y를 누르면 완료된다.


Esc로 빠져나간 후 재부팅 하면 password가 해제된 것을 확인할 수 있다.

박영식 (비회원)
  • 3
    • 글자 크기

댓글 달기

페르미 패러독스

[원문보기]
페르미 이름이 붙은 또 다른 유명한 에피소드가 '페르미 패러독스'다. 이것은 지구 외 문명(생물)의 존재유무에 대한 것으로 다음과 같다.

우주의 크기와 별의 수, 역사의 길이를 생각할 때 지구 외 문명(Extra Terrestrial Civilization, 이하 ETC)이 존재하지 않는 것은 이상하다. 그러나 지구상에서 이제껏 ETC는 목격되지 않았다.

페르미는 이 화제를 동료들에게 자주 던지면서 "다들 어디에 있는 거지?" 하고 물었다고 한다. 이 패러독스를 페르미 패러독스라고 한다. 이 ETC의 존재확률에 관해서는 전형적인 페르미 추정을 응용할 수 있는 과제다. 참고로 미국의 천문학자 프랭크 드레이크 공식'을 유도해냈다.
드레이크 방정식 : N = R X fp X ne X fl X fi Xfc X L
N: 은하계에서 통신할 수 있는 ETC의 수
R: 은하계에서 1년에 별이 탄생할 확률
fp : 행성을 가진 항성의 확률
ne : 행성을 가진 항성 가운데 생명이 유지할 수 있는 환경을 가진 행성의 수
fl : 생명을 유지할 수 있는 행성 가운데 실제로 생명이 있을 확률
fi : 그 행성 가운데 생명이 지적인 생명체로 발전(진화)할 확률
fc : 그 가운데 항성 간 통신을 할 수 있는 문화가 발달할 확률
L : 그런 문화가 통신을 할 기간의 길이

errordlg의 활용 matlab alert의 기능 수행

[원문보기]
errordlg

Create and display an error dialog box


Syntax


  • errordlg
    errordlg('errorstring')
    errordlg('errorstring','dlgname')
    errordlg('errorstring','dlgname','on')
    h = errordlg(...)

Description
Matlab의 alert이다. 찾느라 약간 시간이 걸렸다. 월......
on을 쓰면, 기존에 box가 있는 것을 체크하여 새로 띄우지 않는다.
h에는 handle을 저장하게 된다.

[Workers] Cloudflare Workers로 서버리스 코딩

[원문보기]

Cloudflare 는 https를 쉽게 제공해주는 서비스로 출발하였다.


해당 기능은 라우팅이나 호스팅과 관련이 있는데, 마이크로 서비스를 사용할 수 있는 Workers를 제공한다.


현재는 nodejs 밖에 사용하지 못한다고 하나, aws에서 nodejs를 lambda로 사용해 봤기 때문에 조금은 수월하게 접근할 수 있었다.


간단한 예제들을 통해 실행, json 다루기, json을 html로 표현하기 등을 해보았다.


json 샘플에서는 header를 json으로 클라이언트에 전달하므로 html이 text로 나온다.


그래서 해당 부분만 수정하여 html 표가 그려질 수 있도록 수정했다.


추후에는 실제 API와 연결하여 활용해 보도록 해야겠다.


'content-type': 'application/json;charset=UTF-8',
==>

'content-type': 'text/html;charset=UTF-8',


/**
 * Example someHost is set up to take in a JSON request
 * Replace url with the host you wish to send requests to
 * @param {string} someHost the host to send the request to
 * @param {string} url the URL to send the request to
 */
const someHost = 'https://jsonplaceholder.typicode.com/';
const url = someHost + 'todos/1';
 
/**
 * gatherResponse awaits and returns a response body as a string.
 * Use await gatherResponse(..) in an async function to get the response body
 * @param {Response} response
 */
async function gatherResponse(response) {
  const { headers } = response;
  const contentType = headers.get('content-type') || '';
  if (contentType.includes('application/json')) {
    return JSON.stringify(await response.json());
  } else if (contentType.includes('application/text')) {
    return response.text();
  } else if (contentType.includes('text/html')) {
    return response.text();
  } else {
    return response.text();
  }
}
 
async function handleRequest() {
  const init = {
    headers: {
      'content-type': 'text/html;charset=UTF-8',
    },
  };
  const response = await fetch(url, init);
  const results = await gatherResponse(response);
  let json = JSON.parse(results);
  let res = "<table><tr><td>"+json.userId+"</td><td>"+json.title+"</td><td>"+json.completed+"</td></tr></table>";
  console.log(json.userId);
  console.log(json.id);
  console.log(json.title);
  console.log(json.completed);
  return new Response(res, init);
}
 
addEventListener('fetch', event => {
  return event.respondWith(handleRequest());
});

[flex] flex를 이용한 영상처리(소스 및 라이브러리)

[원문보기]
1. JDK include JRE 설치 2. Tomcat 6.0 설치 3. LiveCycle Data Services 2 설치 4. lcds2의 was 파일 3개를 Pf/ASF/Tomcat 6.0/webapps 로 복사 5. samples 와 samples/dashboard/dashboard.mxml test 6. 여기서 제공되는 Main.as 파일은 이미 수정되었습니다.[ImageProcessinglabMain.as 파일 수정 import de.popforge.imageprocessing.filters.simplify.*; import de.popforge.imageprocessing.filters.noise.*; 후,] ImageProcessing폴더를 C:Program FilesAdobeFlex Builder 3sdks3.0.0bin 이나, C:Program FilesAdobeFlex Builder 3sdks2.x.xbin 으로 옮긴 후, compile.bat 실행 7. Project 선택 후, File->Property에서 Source path에서 ImageEditing 폴더 추가 8. Library path에서 ImageProcessingswcImageProcessing.swc 추가 예제 페이지 : http://suritam9.woweb.net/HelloWorld/imgproc/ImageEditing.html 참고 페이지 : http://blog.je2050.de/2007/02/08/some-updates/ http://www.harrisfamily.net.nz/devblog/index.cfm/2007/2/4/Image-Processing-and-Flash http://www.mojoflex.net/2007/05/flex-image-processing.html http://www.geocities.com/j_c_desai/ImageEditing/ImageEditing.html * 박영식님에 의해서 게시물 이동되었습니다 (2008-07-06 16:40)

[notion] API를 사용하여 데이터베이스의 목록 출력

[원문보기]

여러 설명페이지에 데이터베이스 기본 정보를 출력하는 예제는 많으나, 목록을 출력하는 예제는 부족하다.


query라는 api를 이용하여 POST 방식으로 호출해야 한다.


데이터의 내용이 있을 경우 results의 배열로 리턴되며, 속성 중 column(여기서는 column)를 추가하여 존재하는 목록을 출력해 보았다.


/**
* Example someHost is set up to take in a JSON request
* Replace url with the host you wish to send requests to
* @param {string} someHost the host to send the request to
* @param {string} url the URL to send the request to
*/
const someHost = 'https://api.notion.com/v1/';
const url = someHost + 'databases/[키]/query';
 
/**
* gatherResponse awaits and returns a response body as a string.
* Use await gatherResponse(..) in an async function to get the response body
* @param {Response} response
*/
async function gatherResponse(response) {
const { headers } = response;
const contentType = headers.get('content-type') || '';
if (contentType.includes('application/json')) {
return JSON.stringify(await response.json());
} else if (contentType.includes('application/text')) {
return response.text();
} else if (contentType.includes('text/html')) {
return response.text();
} else {
return response.text();
}
}
 
async function handleRequest() {
const init = {
method: 'POST',
headers: {
'content-type': 'text/html;charset=UTF-8',
'Notion-Version': '2022-02-22',
'Authorization': 'Bearer secret_키',
},
};
const response = await fetch(url, init);
const results = await gatherResponse(response);
let jsons = JSON.parse(results);
let json = jsons.results[0];
let res = "<table>";
let res1="";
for (i=0;i<jsons.results.length;i++){
json = jsons.results[i];
res1=res1+"<tr><td>"+json.properties.column.rich_text[0].plain_text+"</td><td>"+json.id+"</td><td>"+json.url+"</td></tr>";
}
res = res + res1 + "</table>";
return new Response(res, init);
}
 
addEventListener('fetch', event => {
return event.respondWith(handleRequest());
});

img 파일의 저장

[원문보기]
http://blog.jidolstar.com/web_example/317/

위의 글을 참고하여, img 파일을 캡쳐 후, 저장하였다.

데모 페이지 : http://suritam9.woweb.net/webhard/flex/image.html

원리는 읽어온 image를 base64로 변환해, php파일로 보내서, php에서는 base64 code를 디코드해서 .jpg로 저장한다. * 박영식님에 의해서 게시물 이동되었습니다 (2008-07-06 16:40)

[push챗봇] 구글 앱스 스크립트 X 행아웃 채트(구글 채트)

[원문보기]

행아웃 채트가 구글채트로 이름이 변경되었다.


개별 도메인 사용자만 이용할 수 있는데, 무료 계정도 모바일은 가능하다.

(chat.google.com) 로 접속하면 PC에서도 이용 가능하고 대화방의 이름을 얻을 수 있기 때문에, 6의 예제 코드에 space.name 에 하드 코딩 가능하다.


https://suritam9.pe.kr/index.php?mid=imp&document_srl=1405 에서 이미 대화형 봇을 다뤘으며, 이번 건은 push형이다.


그동안은 integramat 이나 다른 수단을 이용했는데, 구글 앱스 스크립트로 바로 가능한 방법이 있어 시도해 봤다.


https://medium.com/@stephane.giron/send-push-message-to-hangouts-chat-with-apps-script-274ddadcbc55


1. 구글 클라우드 플랫폼 서비스 계정에서 계정 생성 및 키를 만든다.(JSON 형태 다운로드 파일 보관)

2. 앱스 스크립트 라이브러리에서 Oauth2 를 설치하는데, 1B7FSrk5Zi6L1rSxxTDgDEUsPzlukDsi4KGuTMorsTQHhGBzBkMun4iDF 로 검색한다.

3. 1에서 다운 받은 파일에 PRIVATE_KEY 와 CLIENT_EMAIL를 복사하고 서비스 생성 스크립트를 실행시킨다.


var PRIVATE_KEY = '-----BEGIN PRIVATE KEY-----\n...\n-----END PRIVATE KEY-----\n';
var CLIENT_EMAIL = '...';
/**
* Configures the Chatbot service.
*/
function getChatbotService() {
return OAuth2.createService(‘MyChatBot’)
// Set the endpoint URL.
.setTokenUrl(‘https://accounts.google.com/o/oauth2/token')
// Set the private key and issuer.
.setPrivateKey(PRIVATE_KEY)
.setIssuer(CLIENT_EMAIL)
// Set the property store where authorized tokens should be persisted.
.setPropertyStore(PropertiesService.getScriptProperties())
// Set the scope.
.setScope(‘https://www.googleapis.com/auth/chat.bot');
}

4. 토큰이 발행되는지 테스트 한다.

/**
* Test for getting access token
*/
function getAccessTokenTest() {
var service = getChatbotService();
if (service.hasAccess()) {
Logger.log(service.getAccessToken());
} else {
Logger.log(service.getLastError());
}
}

5. 참고 URL 에 빠져 있는 부분인데, 봇을 만들어 채팅방에 추가해야 한다. (봇 만들기는 다른 사이트를 검색하여 아이콘 등을 설정한다.)

권한은 도메인 내로 해야 head 배포 id 사용이 가능하다.

image.png

배포 id는 게시에 메니페스트에서 배포를 선택하여 lastesthead deployment 배포에서 getid 를 선택하여 확인한다.

0.png


6.  예제 코드를 이용해 해당 채팅방에 메시지를 보내본다.


/**
* Authorizes and makes a request to the Hangouts Chat API for :
* - Getting all spaces the bot is installed
* - Sending message when space is a Direct Message space
*/
function sendPushMessage() {
var service = getChatbotService();
if (service.hasAccess()) {
//WE retrieve all the spaces bot has been added
var url = 'https://chat.googleapis.com/v1/spaces';
var response = UrlFetchApp.fetch(url, {
headers: {
Authorization: 'Bearer ' + service.getAccessToken()
}
});
var rep = JSON.parse(response.getContentText());
if(rep.spaces && rep.spaces.length > 0){
for(var i = 0; i < rep.spaces.length; i++) {
var space = rep.spaces[i];
if(space.type == "DM"){
//We send message only to Direct Message room.
var url = 'https://chat.googleapis.com/v1/'+space.name+'/messages';

var options = {
method : 'POST',
contentType: 'application/json',
headers: {
Authorization: 'Bearer ' + service.getAccessToken()
},
payload : JSON.stringify({ text: "Hello world !" })
}

//We send message to the DM room
UrlFetchApp.fetch(url, options);
}else{
//If Type is 'ROOM' or 'TYPE_UNSPECIFIED' we don't send notification.
}
}
}else{
Logger.log('Bot is not added to any spaces');
}
} else {
Logger.log(service.getLastError());
}
}


7. 오류가 발생한다면 구글 개발자 콘솔에서 행아웃 채트 API 활성화를 누락했거나, 채팅방이 잘 확인되는지, space 에 대한 참여 멤버, 대화방 명 등을 확인해 보면 디버깅에 도움이 된다.

https://developers.google.com/hangouts/chat/reference/rest/v1/spaces

https://developers.google.com/hangouts/chat/reference/rest/v1/spaces.members

https://developers.google.com/hangouts/chat/reference/rest/v1/spaces.messages


[AIR] 클립보드 내용 보기

[원문보기]
TEXT와 IMAGE를 다 가능하게 했습니다.
http://www.flexets.com/show-image-from-clipboard 를 참고 했습니다. * 박영식님에 의해서 게시물 이동되었습니다 (2008-07-06 16:40)

flex 페이지 이동

[원문보기]
<mx:Script>
 <![CDATA[
private function goUrl(URL:String):void {
    var url:URLRequest = new URLRequest(URL);
    var uv:URLVariables = new URLVariables();
    url.method = "GET";
   
    /**    
    * 파라메터 전달
    * 파라메터명 uv.파라메터명 = "파라메터값"
    */
 
    uv.board = "guest";
    uv.no= "100"; 
    url.data = uv;
    navigateToURL(url);
}
 ]]>
</mx:Script>
<mx:Button x="169" y="274" label="Button" click="goUrl('http://google.com');"/>

이런 간단한 것도 정리해야 나중에 쓸데가 있다. ㅋ

활용한 함수

[원문보기]
set(handles.in_play,'enable','on');

속성을 변경한다.

if (strcmp(fs_ampl,' ') || str2num(fs_ampl)<=50)
    msgbox('50보다 큰 값을 입력하세요');

if의 여러 값을 체크하는 연산자


axes(handles.axes4);
plot(0,0);

plot을 0,0으로 하여, 초기화 효과를...

2008년 7월 16일 - 부가세 확정신고

[원문보기]
예정신고를 했기 때문에, 4~6월분만 했다.

창업일지 - 홈페이지에 CCL 표기

[원문보기]
라이센스에 대한 구분이 필요해졌다.

json encoding, decoding

[원문보기]
json에 관한, flex에 대해서도 흥미로운 자료가 많다.

그런데, 무작정 갖다 쓰는게 부담이 된다.. 또한 홍길동이 벌써 서른이라니.....

<?xml version="1.0" encoding="utf-8"?>
<mx:Application xmlns:mx="http://www.adobe.com/2006/mxml" layout="absolute" initialize="initApp()">
        <mx:Script>
                <![CDATA[
                        import com.adobe.serialization.json.JSON;
                        import mx.controls.Alert;
                        
                        private function initApp():void{
                                var obj:Object = new Object();
                                obj.name="홍길동";
                                obj.age=30;
                                
                                var json:String = JSON.encode(obj);
                                trace(json);
                                
                                var obj2:Object = JSON.decode(json);
                                mx.controls.Alert.show(json + obj2.name + "," + obj2.age);
                        }
                ]]>
        </mx:Script>
</mx:Application>

파일1은 flex관련 문서이고, file2는 flex용 json라이브러리이다.

flex 외부 변수 이용, 받기, 현재 url

[원문보기]
http://www.abdulqabiz.com/blog/archives/macromedia_flex/how_to_get_url.php

나는 제목과 같은 검색어로 꾸준히 찾았던 것 같다.

역시 방법은 있었다.

우....

친절하게 소스파일까지...ㅋㅋ

travelling salesman problem

[원문보기]
http://webscripts.softpedia.com/script/Miscellaneous/Traveling-Salesman-Problem-34479.html

배열의 사용
1. (:,1) 하면, 1열의 정보를 출력한다.
2. (1,:) 하면, 1행의 정보를 출력한다.
3. [mat mat(1)]하면, 첫행의 정보를 뒤에 덧붙인다.
4. zeros(2,4) 하면, 2x4의 0행렬을 만든다.
5. randperm(x)하면, 1~x까지의 랜덤한 자연수 배열을 만든다.
6. plot은 x,y의 2차 그래프를 그린다.
7. plot3는 x,y,z의 3차 그래프를 그린다.
8. text 함수는 임의의 위치에 문자를 출력한다.
9. colormap sets the current figure's colormap to MAP.
10. flipud함수는 아래와 같이 바꾼다.
  X = 1 4               3 6
        2 5               2 5
        3 6               1 4

melfb.m

[원문보기]

function m = melfb(p, n, fs)
p=9;
n=2048;
fs=2000;
f0 = 700 / fs;
fn2 = floor(n/2);


lr = log(1 + 0.5/f0) / (p+1);


% convert to fft bin numbers with 0 for DC term
bl = n * (f0 * (exp([0 1 p p+1] * lr) - 1));


b1 = floor(bl(1)) + 1;
b2 = ceil(bl(2));
b3 = floor(bl(3));
b4 = min(fn2, ceil(bl(4))) - 1;


pf = log(1 + (b1:b4)/n/f0) / lr;
fp = floor(pf);
pm = pf - fp;


r = [fp(b2:b4) 1+fp(1:b3)];
c = [b2:b4 1:b3] + 1;
v = 2 * [1-pm(b2:b4) pm(1:b3)];


m = sparse(r, c, v, p, 1+fn2);
size_m = size(m);
plot(linspace(0, (fs/2), (n/2)+1),m);
%title('Mel-scale filter bank');
xlabel('Frequency (Hz)');
set(get(gca,'xlabel'),'FontSize',20);
ylabel('Amplitude');
set(get(gca,'ylabel'),'FontSize',20);
set(gca, 'XTick',[0:100:2000], 'XTickLabel',[0:100:1000],'fontsize',20);
set(gca, 'YTick',[0:1:2], 'YTickLabel',[0:1:2],'fontsize',20);

터보코드

[원문보기]
bdclose all;
set_param(0, 'CharacterEncoding', 'windows-1252');

simulink를 저장하기 전에 위와 같이 encoding을 변경해준다. 폴더나 파일명이 한글이면 안된다.

[구글핏] fitnees API 를 이용한 구글 스프레드시트로 데이터 가져오기

[원문보기]

https://ithoughthecamewithyou.com/post/export-google-fit-daily-steps-to-a-google-sheet


위 사이트를 참고해 진행한다.


1) 일단 코드를 다운로드 하고, API 콘솔을 이용해 https://console.cloud.google.com/apis 새로운 프로젝트를 만든다.(기존 프로젝트 이용 가능)

2) API 및 서비스 사용 설정에서 fitnees API 를 활성화 시킨다.

3) 사용자 인증정보에서 사용자 인증 정보 만들기를 선택한다.

4) OAuth 클라이언트 ID를 선택하고 애플리케이션 유형을 웹 애플리케이션으로 한다.

5) 이름을 "GF" 등으로 설정하고 승인된 리디렉션 URI 에 https://script.google.com/macros/d/{SCRIPTID}/usercallback 를 입력한다.


6) {SCRIPTID} 를 입력하기 위해 구글 드라이브에서 스프레드시트를 만들고, 스크립트 편집기를 열어 1)의 코드를 저장한 뒤, URL으 확인한다.

7) URL에 나온 스크립트 경로가 {SCRIPTID} 이다.

8) OAuth 클라이언트 ID 만들기를 선택하면 6)에서 저장한 코드에 Client ID, Client Secret을 입력할 수 있는 클라이언트 ID, 클라이언트 보안 비밀은 얻을 수 있다.

9) 저장이 끝나면 시트를 새로고침하여 OnOpen 함수가 자동 동작하도록 하여 Google Fit 메뉴를 확인한다.

10) Authorize...... 를 시작으로 시트이름을 "Metrics"{History}으로 수정하여 구글 피트니스에 저장된 데이터를 가져올 수 있다.


코드를 보면 사용하는 시트이름이 다음과 같다. 두 개의 시트를 생성하여 AppendRow null 오류를 방지한다.


function getMetrics() {

  getMetricsForDays(1, 1, 'Metrics');

}


function getHistory() {

  getMetricsForDays(1, 60, 'History');

}


fitnees.png


cd.png


이전 1 ... 3 4 5 6 7 8 9다음
첨부 (2)
7.jpg
46.1KB / Download 107
8.jpg
57.9KB / Download 115
9.jpg
66.7KB / Download 110
위로