MWFeedParser 를 다운로드 한다.
예제 파일에서 NSDate+InternetDateTime.h/m 를 복사해 넣고, 프로젝트에 추가한다.
파일에 다음을 적용한다.
[RootViewController.m]
// Add to top of file
#import "NSDate+InternetDateTime.h"
// Replace line that sets articleDate to nil in parseRss
NSDate *articleDate = [NSDate dateFromInternetDateTimeString:articleDateString formatHint:DateFormatHintRFC822];

// Replace line that sets articleDate to nil ni parseAtom
NSDate *articleDate = [NSDate dateFromInternetDateTimeString:articleDateString formatHint:DateFormatHintRFC3339];
FileNew File, choose iOSCocoa Touch ClassObjective-C 로 NSArray+Extras를 생성한다.
[NSArray+Extras.h]//
// Adapted from: http://blog.jayway.com/2009/03/28/adding-sorted-inserts-to-uimutablearray/
//
#import <Foundation/Foundation.h>
@interface NSArray (Extras)
typedef NSInteger (^compareBlock)(id a, id b);
-(NSUInteger)indexForInsertingObject:(id)anObject sortedUsingBlock:(compareBlock)compare;
@end
[NSArray+Extras.m]#import "NSArray+Extras.h"
@implementation NSArray (Extras)
-(NSUInteger)indexForInsertingObject:(id)anObject sortedUsingBlock:(compareBlock)compare {
NSUInteger index = 0;
NSUInteger topIndex = [self count];
while (index < topIndex) {
NSUInteger midIndex = (index + topIndex) / 2;
id testObject = [self objectAtIndex:midIndex];
if (compare(anObject, testObject) < 0) {
index = midIndex + 1;
} else {
topIndex = midIndex;
}
}
return index;
}
@end
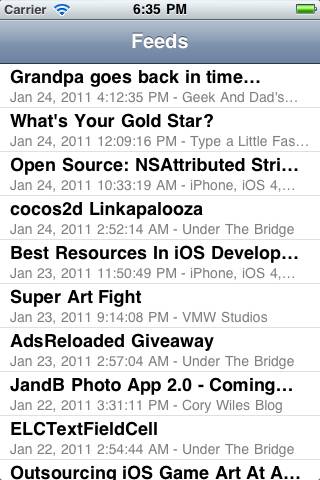
이제 아래에 다음 코드를 추가하면, 날짜 순 정렬 결과를 볼 수 있다.
[RootViewController.m]
// Add to top of file
#import "NSArray+Extras.h"
// In requestFinished, replace the line that sets insertIdx to 0 with this
int insertIdx = [_allEntries indexForInsertingObject:entry sortedUsingBlock:^(id a, id b) {
RSSEntry *entry1 = (RSSEntry *) a;
RSSEntry *entry2 = (RSSEntry *) b;
return [entry1.articleDate compare:entry2.articleDate];
}];

정렬까지 했다. 목록에 관한 작업은 다 끝났다. 이제 내용 보기 부분만 추가하면 끝난다.FileNew File, choose iOSCocoa Touch ClassUIViewController class, make sure “With XIB for User Interface” is checked
UIViewController를 만들고 아래와 같이 코딩한다.
[WebViewController.h]
#import <UIKit/UIKit.h>
@class RSSEntry;
@interface WebViewController : UIViewController {
UIWebView *_webView;
RSSEntry *_entry;
}
@property (retain) IBOutlet UIWebView *webView;
@property (retain) RSSEntry *entry;
@end
XIB 파일에 UIWebView를 추가하고, .h파일에서 등록한 outlet과 연결시킨다.
attribute에서 Scales pages to fit을 선택한다.
[WebViewController.m]// At top of file
#import "RSSEntry.h"
// Under @implementation
@synthesize webView = _webView;
@synthesize entry = _entry;
// Add new methods
- (void)viewWillAppear:(BOOL)animated {
NSURL *url = [NSURL URLWithString:_entry.articleUrl];
[_webView loadRequest:[NSURLRequest requestWithURL:url]];
}
- (void)viewWillDisappear:(BOOL)animated {
[_webView loadRequest:[NSURLRequest requestWithURL:[NSURL URLWithString:@"about:blank"]]];
}
// Add inside dealloc
[_entry release];
_entry = nil;
[_webView release];
_webView = nil;
[RootViewController.h]// Before @interface
@class WebViewController;
// Inside @interface
WebViewController *_webViewController;
// After @interface
@property (retain) WebViewController *webViewController;
[RootViewController.m]// At top of file
#import "WebViewController.h"
// Under @implementation
@synthesize webViewController = _webViewController;
// Replace tableView:didSelectRowAtIndexPath with the following
- (void)tableView:(UITableView *)tableView didSelectRowAtIndexPath:(NSIndexPath *)indexPath {
if (_webViewController == nil) {
self.webViewController = [[[WebViewController alloc] initWithNibName:@"WebViewController" bundle:[NSBundle mainBundle]] autorelease];
}
RSSEntry *entry = [_allEntries objectAtIndex:indexPath.row];
_webViewController.entry = entry;
[self.navigationController pushViewController:_webViewController animated:YES];
}
// In didReceiveMemoryWarning
self.webViewController = nil;
// In dealloc
[_webViewController release];
_webViewController = nil;
위와 같이 하면, 목록에서 선택시 아래 처럼 내용을 볼 수 있다.

이 예제의 소스는 원문사이트에서 다운로드 할 수 있다. http://www.raywenderlich.com/2636/how-to-make-a-simple-rss-reader-iphone-app-tutorial


댓글 달기